By: Team THRIFT Since: Sept 2019 Licence: MIT
- 1. Introduction
- 2. Setting up
- 3. Design
- 4. Implementation
- 4.1. Adding transactions
- 4.2. Setting budgets
- 4.3. Tag/Untag feature
- 4.4. Updating transactions
- 4.5. Cloning transactions
- 4.6. Undo/Redoing undoable commands
- 4.7. Filtering transactions
- 4.8. [Proposed] Data encryption
- 4.9. [Proposed] Artificial Intelligence (AI)
- 4.10. [Proposed] External report generation
- 4.11. Logging
- 4.12. Configuration
- 5. Documentation
- 6. Testing
- 7. Dev ops
- Appendix A: Product scope
- Appendix B: User stories
- Appendix C: Use cases
- Appendix D: Non functional requirements
- Appendix E: Glossary
- Appendix F: Instructions for manual testing
- F.1. Launching and shutting down
- F.2. Setting a monthly budget
- F.3. Adding a transaction
- F.4. Deleting a transaction
- F.5. Updating a transaction’s details
- F.6. Cloning a transaction
- F.7. Listing the transactions
- F.8. Tagging a transaction
- F.9. Untagging a transaction
- F.10. Converting a value
- F.11. Finding a transaction
- F.12. Undoing the previous command
- F.13. Redoing the undone command
- F.14. Showing help window
- F.15. Saving data
1. Introduction
THRIFT is an application for money-conscious NUS students who wish to track their spending, in order to make better informed decisions when it comes to saving money. It maintains records of your daily incoming and outgoing transactions and constantly keeps track of the user’s spending and income. THRIFT is optimised for those who prefer to work with a Command Line Interface (CLI) while still enjoying the benefits of having a Graphical User Interface (GUI). It is a simple, no-frills finance tracker made for our target user group.
1.1. Purpose
This developer guide aims to communicate to the developers working on THRIFT the design and architecture of the implementation. It also includes non-technical details to give the developers an idea of the direction THRIFT intends to take on both current and future features. A developer should be able to understand the design, architecture and goals of THRIFT after reading this guide.
1.2. Scope
This developer guide specifies the technical and non-technical details of THRIFT. The technical aspects include the design and architecture while the non-technical aspects include the user stories, use cases and NFRs.
1.3. About the document
| This symbol indicates a tip that you may find useful when enhancing THRIFT. |
| This symbol indicates information that you may want to take note of when enhancing THRIFT. |
| This symbol indicates information that you need to be cautious of when enhancing THRIFT. |
| add_expense n/Laksa v/4 |
Bold text indicates user input. |
| /src/java/thrift/logic/Logic.java |
Italic text indicates that it is a file/github path. |
currentMonth
|
Text with grey highlight (called a mark-up) indicates that it is a method/variable/parameter name. |
THRIFT
|
Bold text with mark-up indicates a class/package name. |
Model.java
|
Italic text with mark-up indicates a file name. |
2. Setting up
In this section, we will be introducing the way to set up THRIFT.
2.1. Prerequisites
-
JDK 11 or above
-
IntelliJ IDE
IntelliJ by default has Gradle and JavaFx plugins installed.
Do not disable them. If you have disabled them, go to File > Settings > Plugins to re-enable them.
2.2. Setting up the project in your computer
-
Fork this repo, and clone the fork to your computer.
-
Open IntelliJ (if you are not in the welcome screen, click File > Close Project to close the existing project dialog first).
-
Set up the correct JDK version for Gradle.
-
Click Configure > Project Defaults > Project Structure.
-
Click New… and find the directory of the JDK.
-
-
Click Import Project.
-
Locate the
build.gradlefile and select it. Click OK. -
Click Open as Project.
-
Click OK to accept the default settings.
2.3. Verifying the setup
-
Run the
thrift.Mainand try a few commands. -
Run the tests to ensure they all pass.
2.4. Configurations to do before writing code
2.4.1. Configuring the coding style
This project follows oss-generic coding standards. IntelliJ’s default style is mostly compliant with ours but it uses a different import order from ours. To rectify:
-
Go to File > Settings… (Windows/Linux), or IntelliJ IDEA > Preferences… (macOS).
-
Select Editor > Code Style > Java.
-
Click on the Imports tab to set the order.
-
For
Class count to use import with '*'andNames count to use static import with '*': Set to 999 to prevent IntelliJ from contracting the import statements -
For
Import Layout: The order is import static all other imports, import java.*, import javax.*, import org.*, import com.*, import all other imports. Add a <blank line> between each import
-
Optionally, you can follow the UsingCheckstyle.adoc document to configure Intellij to check style-compliance as you write code.
2.4.2. Updating documentation to match your fork
After forking the repo, the documentation will still have the THRIFT branding and refer to the AY1920S1-CS2103T-W12-2/main repo.
If you plan to develop this fork as a separate product (i.e. instead of contributing to AY1920S1-CS2103T-W12-2/main), you should do the following:
-
Configure the site-wide documentation settings in
build.gradle, such as thesite-name, to suit your own project. -
Replace the URL in the attribute
repoURLinDeveloperGuide.adocandUserGuide.adocwith the URL of your fork.
2.4.3. Setting up CI
Set up Travis to perform Continuous Integration (CI) for your fork. See UsingTravis.adoc to learn how to set it up.
After setting up Travis, you can optionally set up coverage reporting for your team fork (see UsingCoveralls.adoc).
| Coverage reporting could be useful for a team repository that hosts the final version but it is not that useful for your personal fork. |
Optionally, you can set up AppVeyor as a second CI (see UsingAppVeyor.adoc).
| Having both Travis and AppVeyor ensures your App works on both Unix-based platforms and Windows-based platforms (Travis is Unix-based and AppVeyor is Windows-based) |
2.4.4. Getting started with coding
When you are ready to start coding, we recommend that you get some sense of the overall design by reading about THRIFT’s architecture.
3. Design
In this section, we will be introducing the individual components that combine together to form THRIFT. We will be including diagrams
drawn with the PlantUML software.
| There is a limitation with PlantUML sequence diagrams whereby the participation line of a member does not terminate after it is destroyed. |
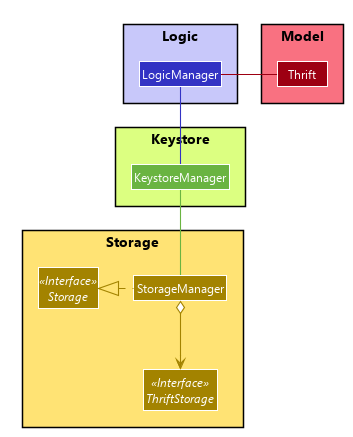
3.1. Architecture
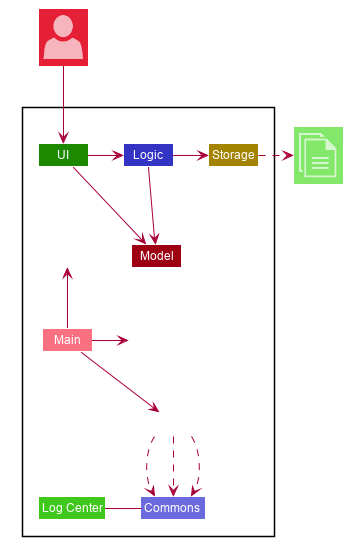
The architecture diagram given above explains the high-level design of the application. We provide a quick overview of each component below.
The .puml files used to create diagrams in this document can be found in the diagrams folder.
Refer to the Using PlantUML guide to learn how to create and edit diagrams.
|
-
At application launch: Initializes the components in the correct sequence, and connects them up with each other.
-
At shut down: Shuts down the components and invokes cleanup method where necessary.
Commons represents a collection of classes used by multiple other components.
The following class plays an important role at the architecture level:
-
LogsCenter: Used by many classes to write log messages to the application’s log file.
The rest of the application consists of four components.
Each of the four components
-
Defines its API in an interface with the same name as the component.
-
Exposes its functionality using a
{Component Name}Managerclass.
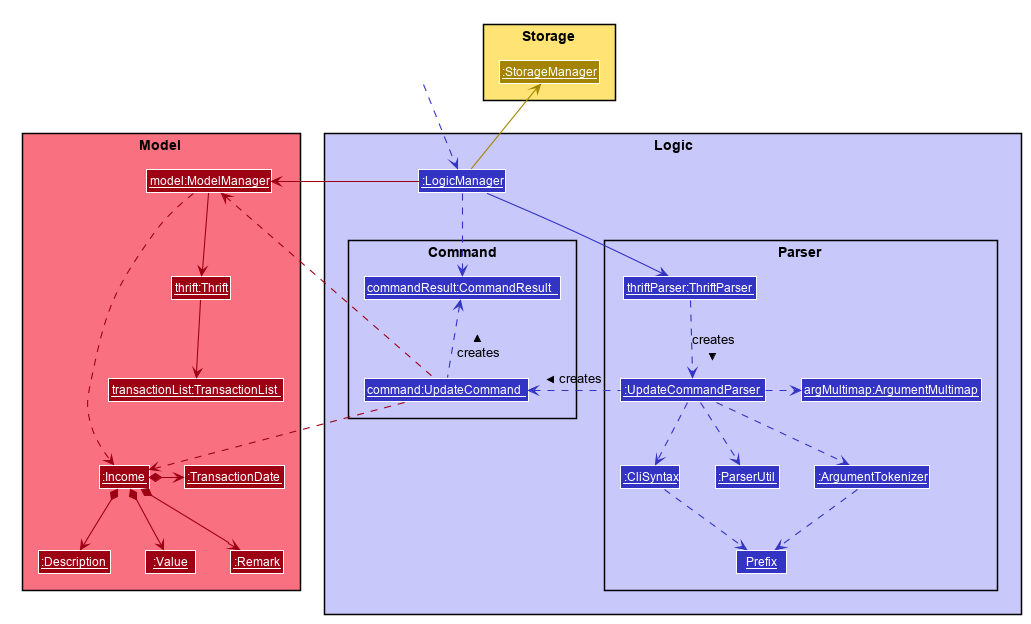
For example, the Logic component (see the class diagram given below) defines its API in the Logic.java interface and exposes its functionality using the LogicManager.java class.
Logic componentHow the architecture components interact with each other
The sequence diagram below shows how the components interact with each other for the scenario where the user issues the command: delete i/1.
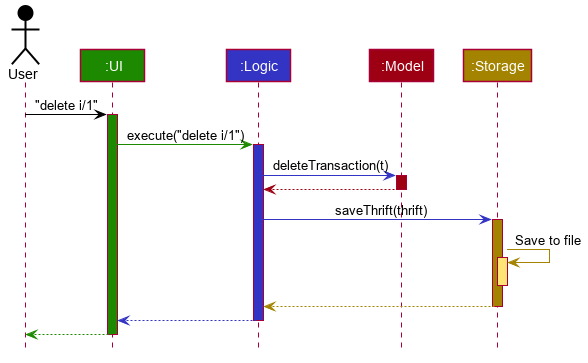
The sections below give more details of each component.
3.2. UI component
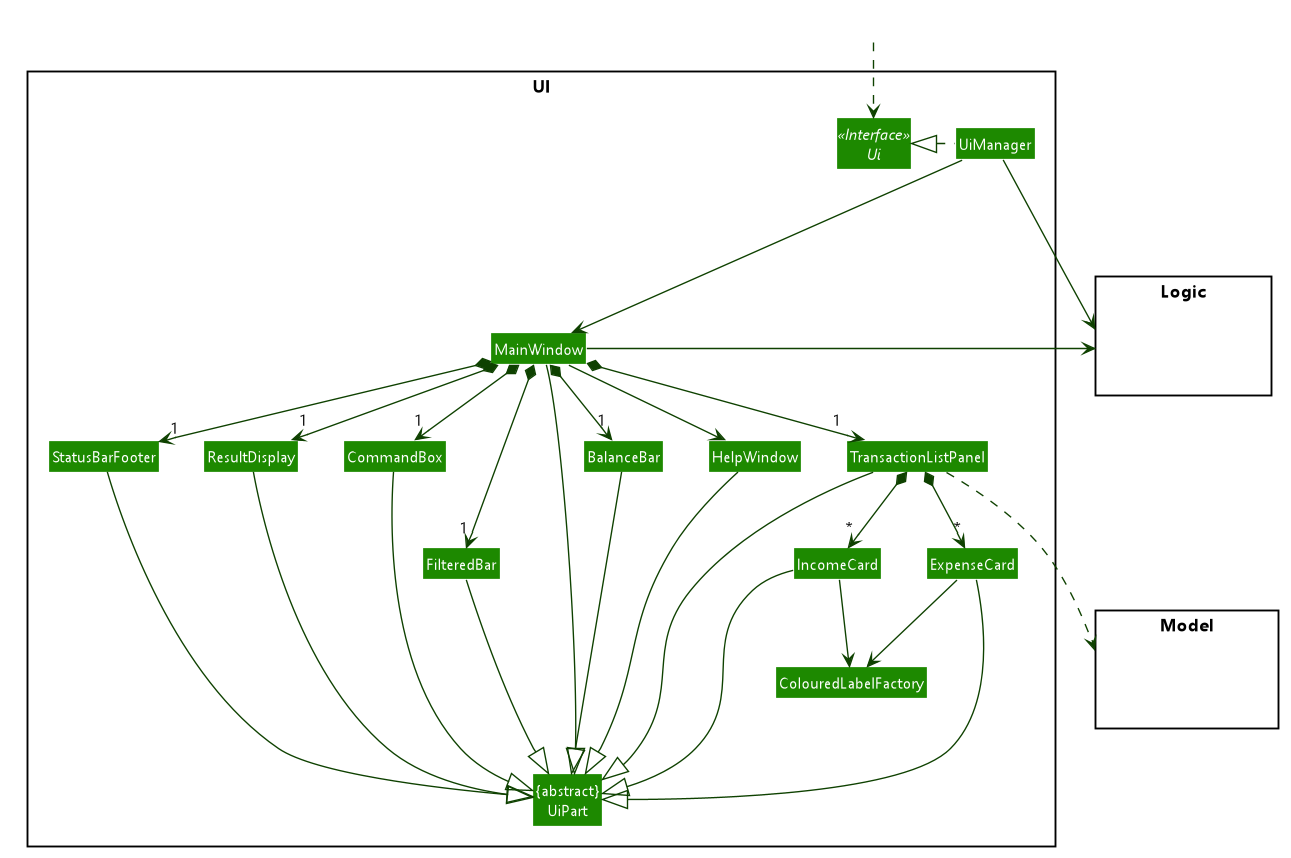
UI componentAPI : Ui.java
The UI consists of a MainWindow that is made up of parts e.g.BalanceBar, CommandBox, ResultDisplay, TransactionListPanel, StatusBarFooter etc. All these, including the MainWindow, inherit from the abstract UiPart class.
The UI component uses JavaFx UI framework. The layout of these UI parts are defined in matching .fxml files that are in the src/main/resources/view folder. For example, the layout of the MainWindow is specified in MainWindow.fxml
The UI component does the following actions:
-
Executes user commands using the
Logiccomponent. -
Listens for changes to
Modeldata so that the UI can be updated with the modified data.
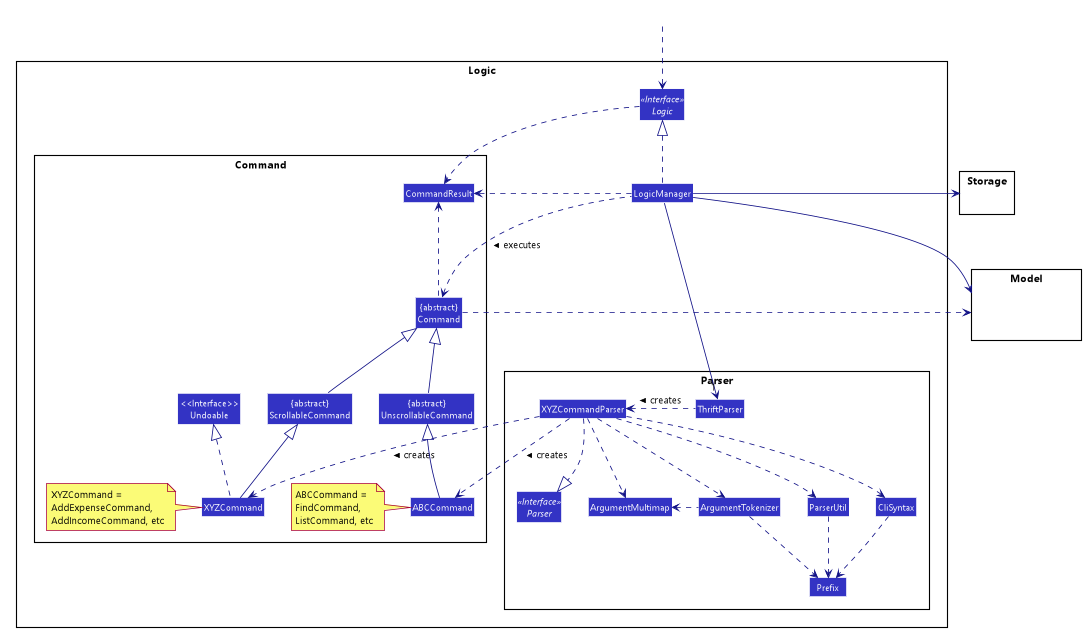
3.3. Logic component
Logic componentAPI : Logic.java
Logic is an interface which LogicManager implements, allowing access to the API. The following items are examples on how the LogicManager
class can be interacted with:
-
LogicManageruses theThriftParserclass to parse the user command. -
This results in a
Commandobject which is executed by theLogicManager. -
The command execution can affect the
Model(e.g. adding aTransaction). -
The result of the command execution is encapsulated as a
CommandResultobject which is passed back to theUi. -
In addition, the
CommandResultobject can also instruct theUito perform certain actions, such as displaying help to the user.
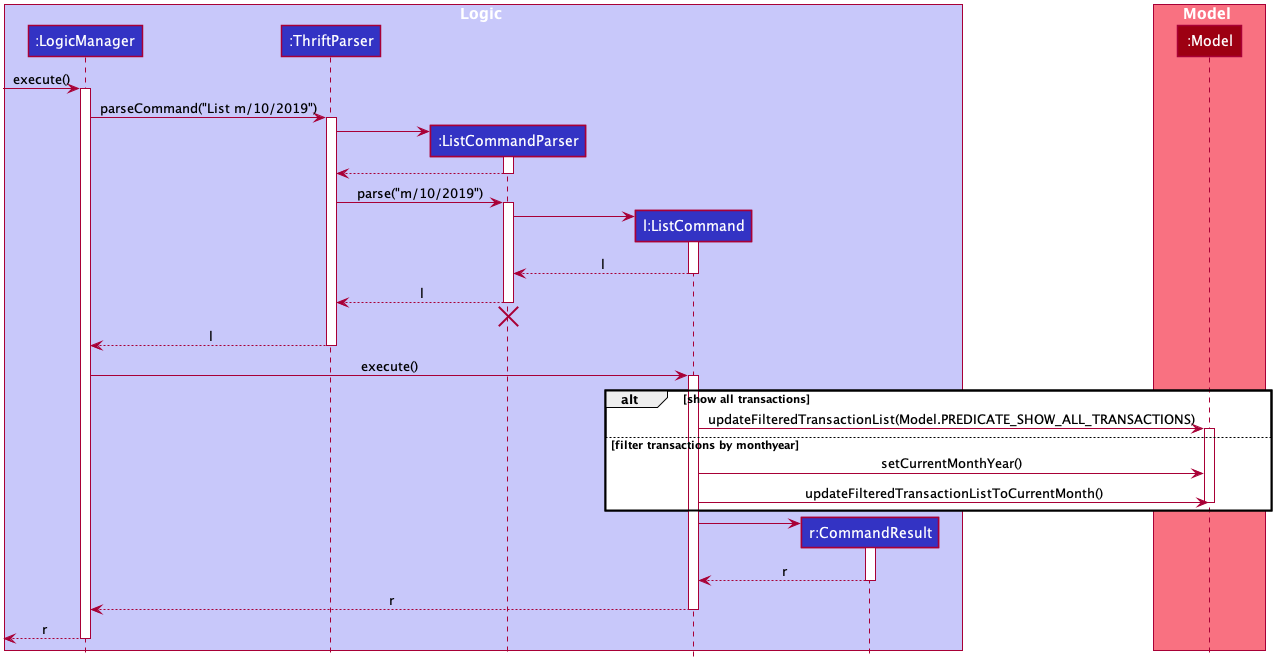
Given below is the sequence diagram for interactions within the Logic component for the execute("delete i/1") API call.
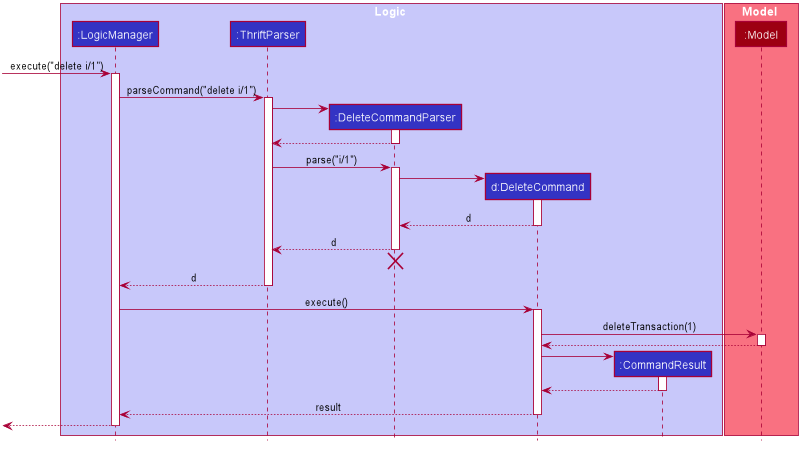
Logic component for the delete i/1 command
The lifeline for DeleteCommandParser should end at the destroy marker (X) but due to a limitation of PlantUML, the lifeline reaches the end of diagram.
|
3.4. Model component
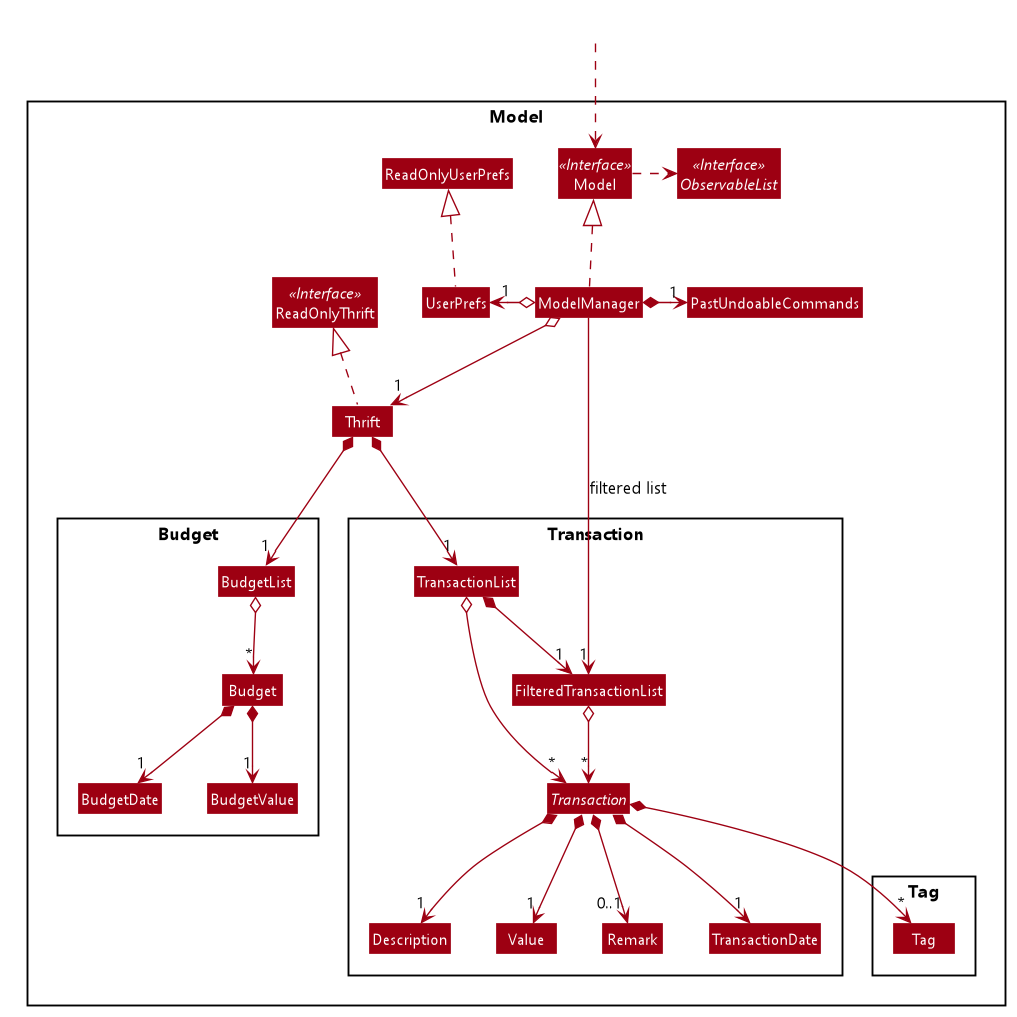
Model componentAPI : Model.java
The Model:
-
stores a
UserPrefobject that represents the user’s preferences. -
stores
THRIFTdata. -
stores
BudgetListwhich contains budget set for different months by the user. -
stores
PastUndoableCommandswhich keeps track of undoable command objects for future undo and redo operation. -
exposes an unmodifiable
ObservableList<Transaction>that can be 'observed' e.g. the UI can be bound to this list so that the UI automatically updates when the data in the list change. -
does not depend on any of the other three components.
As a more OOP model, we can store a Tag list in THRIFT, which Transaction can reference. This would allow THRIFT to only require one Tag object per unique Tag, instead of each Transaction needing their own Tag object. An example of how such a model may look like is given below.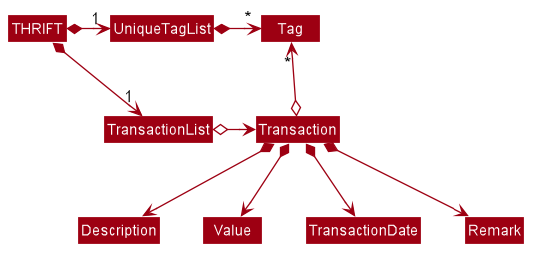
|
3.5. Storage component
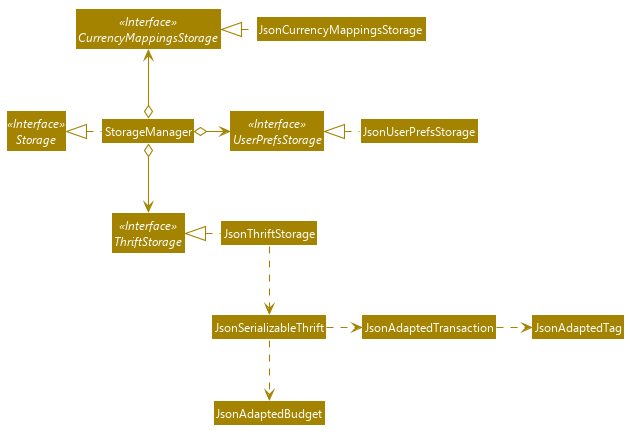
Storage componentAPI : Storage.java
The Storage component:
-
can save
UserPrefobjects in json format and read it back. -
can save the
THRIFTdata in json format and read it back:-
JsonAdaptedTransactionstoresTransactionobjects inJSONformat. -
JsonAdaptedTagstoresTagobjects inJSONformat, nested underJsonAdaptedTransaction. -
JsonAdaptedBudgetstoresBudgetobjects inJSONformat. -
JsonCurrencyMappingsstoresCurrencyMappingsHashMaps inJSONformat.
-
3.6. Common classes
Classes used by multiple components are found in the thrift.commons package.
4. Implementation
This section describes some noteworthy details on how we implemented certain features and the various considerations that we had.
4.1. Adding transactions
We allow users to add Expense/Income transactions into THRIFT which enables record-keeping. This section shows how we handle such
requests from the user at the back-end.
4.1.1. Implementation
We store every single Transaction added by the user into an ObservableList<Transaction>, which is a list object in TransactionList. We used an ObservableList because whenever there are changes to the list, any other component
of THRIFT using it will automatically reflect its changes.
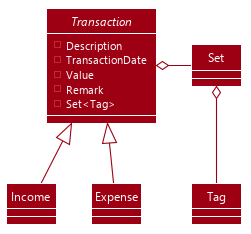
We implemented adding a Transaction through the following commands: add_expense/add_income. This process leverages on polymorphism: Expense and Income are both subclasses of the abstract class Transaction.
Each Transaction contains the following mandatory fields: Description, TransactionDate and Value; as well as optional fields: Remark,
and Set<Tag>. The following class diagram depicts this relation:
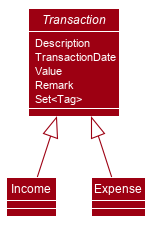
Because of this polymorphism relation, many of the driver functions in THRIFT simply references Transaction and it will work for both Expense
and Income transaction objects. For example, when inserting a new Expense/Income, the AddTransactionCommandParser will determine
which object to initialize. The sequence diagram below shows how adding a Transaction work in the back-end:
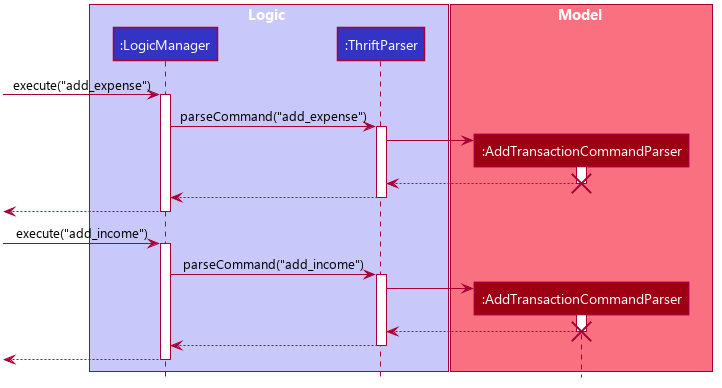
Transaction is processed with polymorphismExpense and Income are normally instantiated by either ExpenseCommandParser#parse(String args) or IncomeCommandParser#parse(String args), which
attempts to parse the various parameters supplied in args and return either a Expense or Income object. The following conditions will cause a ParseException
to be thrown by the parser:
-
Missing parameters
-
Incorrect syntax (i.e. missing prefix, if it is required)
-
Illegal values in parameters (i.e. special characters and symbols entered for a integer-only field)
-
Multiple occurrences of parameters which only expects a single entry
| If the user input is incorrect due to any of the reasons above, the usage syntax will be shown. |
We will demonstrate how a Transaction is added into THRIFT and how the back-end handles each step of the process:
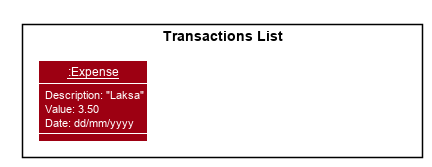
Step 1. The user executes add_expense n/Laksa v/3.50 to insert an Expense with its Description set to "Laksa"
and its Value set to "3.50". The TransactionDate is set to the user’s current system date in the form "dd/mm/yyyy".
The input is now checked and an attempt to parse each parameter occurs:
-
Descriptionis parsed byAddTransactionCommandParser#parseTransactionDescription(ArgumentMultimap) -
Valueis parsed byAddTransactionCommandParser#parseTransactionValue(ArgumentMultimap) -
TransactionDateis instantiated byAddTransactionCommandParser#parseTransactionDate()
ArgumentMultimap is a class that stores all the parsed parameters taken from the user input.
|
Since the user input is valid, the Expense is successfully created and inserted into the transaction list.
The transaction list now contains 1 Transaction object.
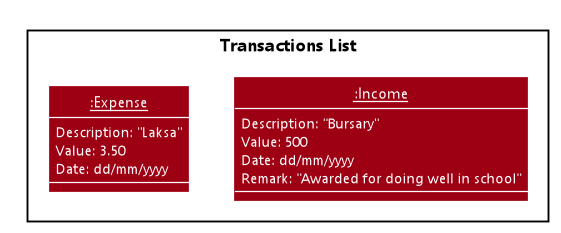
Step 2. The user executes add_income n/Bursary v/500 r/Awarded for doing well in school to insert an Income.
The input is now checked in a similar fashion as in Step 2 except that:
-
Remarkis parsed byAddTransactionCommandParser#parseTransactionRemark(ArgumentMultimap)
Again, since the input is valid, the Income is successfully added into the transaction list. The transaction list
now contains 2 Transaction objects.
The following activity diagram summarizes what happens when the user executes a command to add a new Transaction:
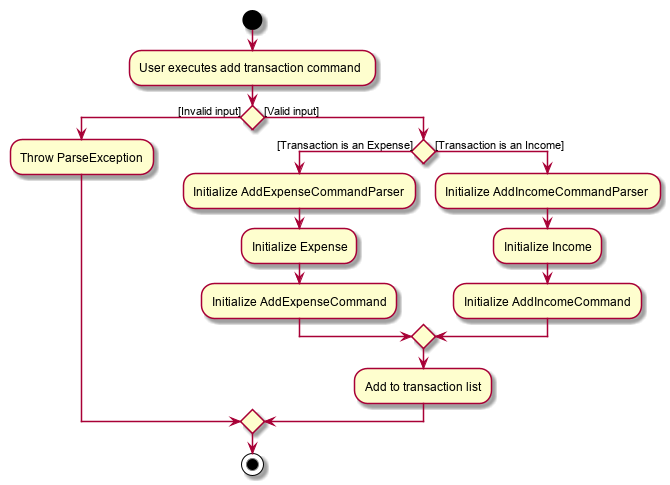
Transaction into the transaction list4.1.2. Design considerations
There are many different ways to implement how a transaction is added into THRIFT. In this section, we will be
justifying why we chose to implement it the way we did.
Aspect: Differentiating between Expense and Income
-
Alternative 1: (current choice): Introduce a
Transactionparent class which bothExpenseandIncomeextend from.-
Pros: Introduces polymorphism, easing references to either classes by simply referencing the
Transactionobject. For example, using a singleList<Transaction>instead of needing 2 separate listsList<Expense>andList<Income>. -
Cons: Reduces the readability of the program as polymorphism can be confusing.
-
-
Alternative 2: Keep
ExpenseandIncomeclasses separate, with each having their own specialized methods.-
Pros: Maintains an intuitive design:
Expensededucts money andIncomeincreases money. -
Cons: Incurs significant overhead and duplicated codes since it is likely that both
ExpenseandIncomewill have very similar methods.
-
Alternative 1 was chosen because we want to model it close to the real world: both Expense and Income are described
as being a Transaction.
Aspect: Managing how Value is stored and handled in Expense and Income
-
Alternative 1: (current choice): Disallow negative
ValueinExpenseobject, only using positive amount for bothExpenseandIncome-
Pros: Removes the need to implement support for inserting negative
Value. This is due to howValueconstraints are applied when restoringTHRIFTdata from the data file. -
Cons: Requires the developer to manually negate the
Valuewhenever calculations are done with aExpenseobject.
-
-
Alternative 2: Allow only negative amount in
Expenseobject and only positive amount inIncomeobject-
Pros: Calculating the balance becomes trivial - simply sum up the entire
List<Transaction>. -
Cons: Parsing the user input to allow only a single negative symbol and no other symbols causes an overhead.
-
Alternative 1 was chosen because we want to keep the transaction list clean - only positive integers are stored.
4.2. Setting budgets
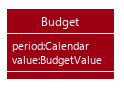
We allow the user to maintain a Budget for each calendar month. This section details how THRIFT handles
requests made by the user who is trying to set a budget for their desired month. Each Budget stores a Calendar attribute period
and a BudgetValue attribute value. The following class diagram shows how a Budget object looks like:
4.2.1. Implementation
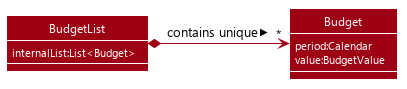
We store every Budget set by the user into BudgetList, which is a class containing a List object named internalList.
This list will contain only one Budget object for each month, with the month uniqueness indicated by period in the "MM/YYYY" format.
Below is a class diagram explaining how the relations look:
Whenever the user attempts to set a Budget, THRIFT will check if that Budget currently exists in internalList.
To facilitate the checking, BudgetList contains a few methods that simplify the process:
-
BudgetList#getBudgetForMonthYear(Calendar toCheck)- Checks iftoCheckmatches any of theperiodfrom aBudgetininternalList. -
BudgetList#setBudget(Budget toSet)- AddstoSetintointernalList, possibly overwriting aBudgetininternalListif itsperiodmatches theperiodintoSet. -
BudgetList#removeBudget(Budget toRemove)- RemovestoRemovefrominternalList.
We will demonstrate what happens at the back-end whenever the user sets a budget and overwrites it afterwards. The user has not set any Budget
before, so internalList is empty:
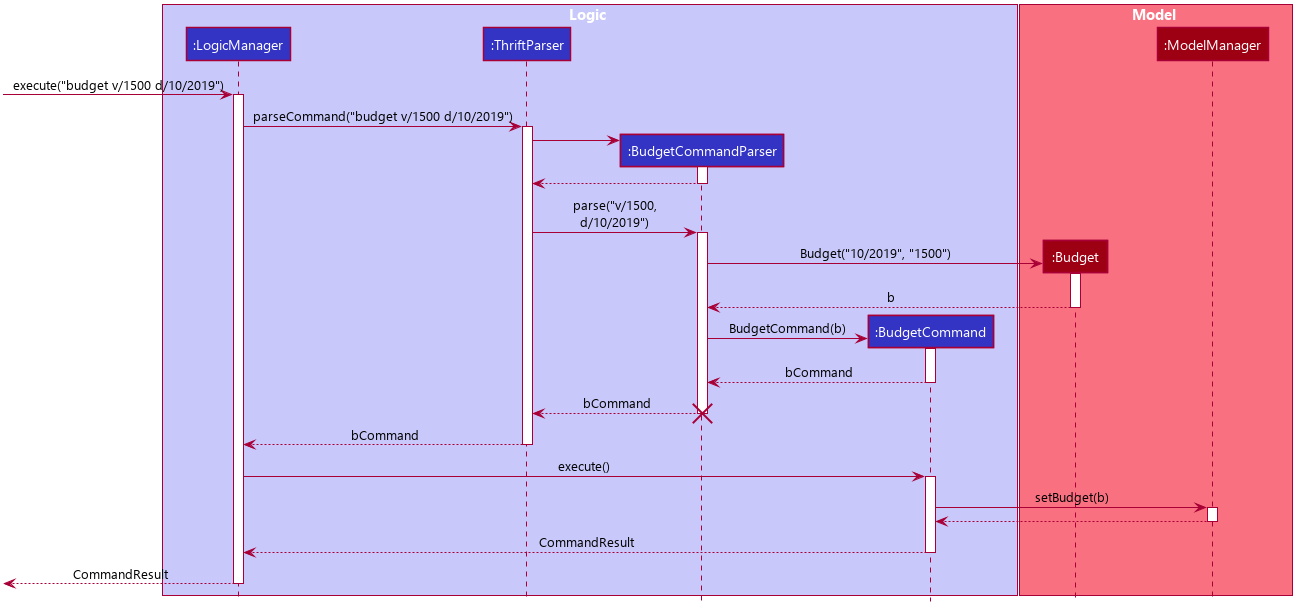
Step 1. The user wishes to set their budget for October 2019 as $1500. They execute the command: budget v/1500 d/10/2019.
The user’s entry is checked by BudgetCommandParser#parse() and an attempt to parse each parameter occurs:
-
Calendaris parsed byParseUtil#parseDate(ArgumentMultimap) -
BudgetValueis parsed byParseUtil#parseBudgetValue(ArgumentMultimap)
ArgumentMultimap is a class that stores all the parsed parameters taken from the user input.
|
Since the user input is valid, the Budget is successfully created and inserted into internalList.
Step 2. The user wishes to set a new budget for October 2019 as $2000. They execute the command: budget v/2000 d/10/2019.
The user’s entry is once again checked to be valid and a new Budget is created. Before it is inserted into
internalList, a check to see if a budget is already set for that month will occur. Since there is already a
budget set for October 2019, the existing budget is replaced by this newly created Budget.
The following code snippet is part of BudgetList#setBudget(Budget toSet) and demonstrates how this checking is done:
// The following variable is declared above:
// List<Budget> internalList = new ArrayList<>();

Optional<Budget> optBudget = getBudgetForMonthYear(toSet.getBudgetDate());
if (optBudget.isPresent()) {
    Budget existingBudget = optBudget.get();
    internalList.set(internalList.indexOf(existingBudget), toSet);
} else {
    internalList.add(toSet);
}
The sequence diagram below depicts what was just elaborated:
Budget is set4.2.2. Design considerations
We have considered various ways as to how Budget should be stored in THRIFT. In this section, we will explain the
rationale on our course of actions.
Aspect: Treat Budget as an Income, therefore extending from Transaction
-
Alternative 1 (current choice):
Budgetshould remain separate fromTransactionas it can introduce unnecessary coupling. Budget does not need to containRemarknorTag.-
Pros: Freedom in dealing with
Budgetobjects, no need to comply withTransactionattributes. -
Cons: Overhead in dealing with a separate list in
Thriftclass, ultimately requiring 2 lists to holdTransactionandBudgetrespectively.
-
-
Alternative 2:
Budgetshould extendTransactionsince it is somewhat a form ofIncome.-
Pros: Able to store
BudgetintoTransactionList, resulting in only one list to manage.Budgetcan also be easily displayed as aTransactioncard on the UI, reducing the need to handle a separate list. -
Cons: May cause possible complications to arise if the user wishes to set a different budget and the
TransactionListis huge.THRIFTneeds to look through the huge list to find theBudgetto replace.
-
Again, we went with alternative 1 because we wanted to simulate the real-world relation. Otherwise, there might be confusion
since Budget is not really related to Transaction in the real world.
4.3. Tag/Untag feature
We allow the user to add and remove custom Tag objects in Transaction entries so that they can categorise the entries to their own liking.
The following sections describe how this feature is implemented and the design considerations that led to the solution.
4.3.1. Implementation
The tag/untag command performs modifications on existing Transaction entries that reside in the Model. Implemented using the concept of polymorphism , both Expense and Income objects extend the abstract class Transaction, and are treated the same way in the context of the tag/untag command.
Tag inside a TransactionDue to this polymorphic implementation, many of the driver functions in THRIFT use the Transaction class for both Expense
and Income objects. For example, when tagging a new Expense/Income object, the TagCommandParser will treat them as the same object:
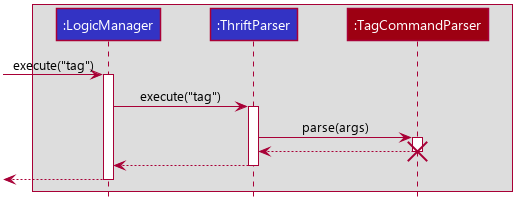
TagCommandParser is calledWhen a user enters a tag/untag command, it is parsed by the respective TagCommandParser#parse(String args) and UntagCommandParser#parse(String args) parsers and returns a TagCommand command object or a UntagCommand command object respectively, which will be executed. For both commands, the following conditions will cause a ParseException to be thrown by their respective parsers:
-
Missing parameters
-
Incorrect syntax (i.e. missing prefix, if it is required)
-
Illegal values in parameters (i.e. non-alphanumeric values given for
Tagnames) -
Multiple occurrences of parameters which only expects a single entry
| If the user input is incorrect due to any of the reasons above, the corresponding usage syntax will be shown. |
The following is an example on how a Tag is added and removed from a Transaction, with details on the processes done in the backend.
Step 1. The user launches the application with data from previous sessions. THRIFT currently contains two Transaction objects and the user is going to perform tagging and un-tagging operations on one of them.
Step 2. The user executes the command tag i/1 t/Delicious to tag the Transaction at Index 1 with the Tag "Delicious". The input is checked with the TagCommandParser parser and an attempt to parse each parameter occurs:
-
Indexis parsed byParserUtil#parseIndex(String) -
Tagstrings are parsed byParserUtil#parseTags(Collection<String>)which callsParserUtil#parseTag(String)iteratively for every string in the collection
ParserUtil is a class that contains useful functions for parsing the inputs from the user.
|
Tags that already exist inside the specified Transaction will be ignored, and if that results in no tags being added, an error will be shown to the user.
|
Since the user input is valid, a TagCommand command object is created and executed. As a result, a copy of the Transaction object with the specified Tag added replaces the original in the TransactionList at the same position.
Step 3. The user realises that the Tag added was not appropriate. The user then executes the command untag i/1 t/Delicious to untag the Tag "Delicious" from the Transaction at Index 1. The input is now checked with the UntagCommandParser parser and similarly, an attempt to parse each parameter occurs.
-
Indexis parsed byParserUtil#parseIndex(String) -
Tagstrings are parsed byParserUtil#parseTags(Collection<String>)which callsParserUtil#parseTag(String)iteratively for every string in the collection
Tags that do not exist inside the specified Transaction will be ignored, and if that results in no tags being deleted, an error will be shown to the user.
|
Again, since the user input is valid, a UntagCommand command object is created and executed. As a result, a copy of the Transaction object with the specified Tag deleted replaces the original in the TransactionList at the same position.
The following activity diagram summarises what happens when the user executes a command to tag a Transaction.
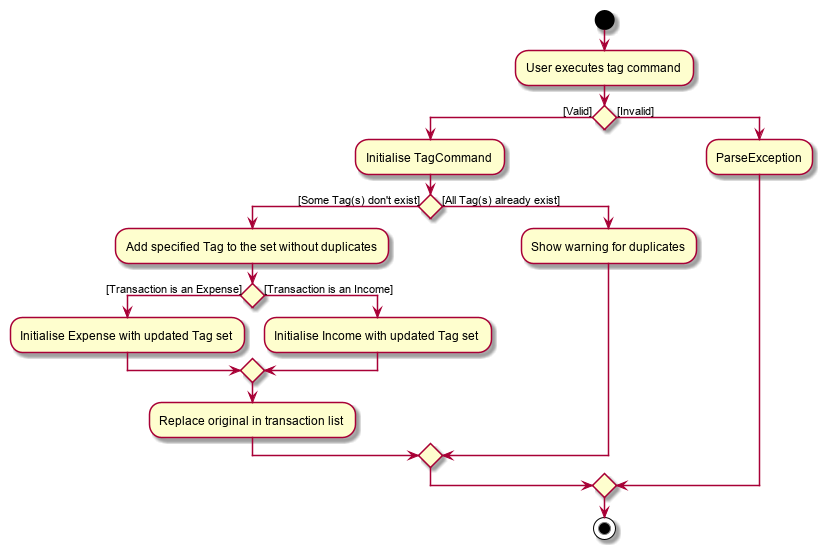
The untag command follows the same flow except for the following differences:
-
Continues with the operation only if at least some
Tagobjects exist inTransactionto be un-tagged -
Ignores
Tagobjects that do not already exist in theTransactionas they are not valid for deletion
4.3.2. Design considerations
Aspect: Mutability of Transaction objects
The mutability of the Transaction objects will affect how well the code follows convention, and here are two designs that can be considered:
-
Alternative 1: (current choice): Create a copy of the
Transactionobject with modified tags and replace the original in theTransactionList-
Pros: Adheres to the Open-Closed principle of the SOLID design principles, guarantees the resultant
Transactionto be as expected and not modified incorrectly during the tag/untag process. -
Cons: Creates a copy of the
Transactionduring the tag/untag process and increases the space complexity of the process.
-
-
Alternative 2: Modify the
Transactionobject directly to modify tags.-
Pros: Modifies the
Transactionobject in place, thus the space complexity of the process is constant. -
Cons: Violates the Open-Closed principle of the SOLID design principles, the
Transactionobject can be modified incorrectly during the tag/untag process.
-
Alternative 1 was chosen as we want to ensure the correctness of the tag/untag process.
Aspect: Uniqueness of Tag objects within a Transaction
The uniqueness of Tag objects within a Transaction will determine how meaningful a tag is, and here are two designs that can be considered:
-
Alternative 1: Do not check if the
Tagobjects exist(s) within aTransactionwhen addingTagobjects and implicitly allow duplicates.-
Pros: Results in a simpler implementation of tag command, as there is no need to check for potential duplicates.
-
Cons: Makes each tag less meaningful as they are no longer unique.
-
-
Alternative 2: (current choice) Check if the
Tagobjects exist(s) within aTransactionwhen addingTagobjects, explicitly prevent duplicates.-
Pros: Makes each tag more meaningful as they are unique.
-
Cons: Results in a more complex implementation of the tag command, as there is a need to check for potential duplicates.
-
Alternative 2 was chosen as we want to ensure that tags are meaningful to the user.
4.4. Updating transactions
The update functionality modifies details of a specified Transaction in the existing list and saves
modifications to the external storage file.
4.4.1. Implementation
Update mechanism utilizes Logic operations with the UpdateCommand class in place of
Command, and a unique UpdateCommandParser class. The following methods are concrete implementations for
update operations:
-
UpdateCommandParser#parse()- Parses the user’s input and creates anUpdateCommandto execute the command. -
UpdateCommand#execute()- Modifies theTransactioninModelwith new details and returns aCommandResult(Step 4 of Logic). -
TransactionList#setTransactionWithIndex()- Sets the modifiedTransactionto its correct position in the existingTransactionList.-
This
TransactionListis wrapped inThriftand itssetTransactionWithIndex()is called throughThrift#setTransactionWithIndex(). -
Thrift#setTransactionWithIndex()is exposed in theModelinterface asModel#setTransactionWithIndex().
-
The following Object Diagram illustrates objects involved in the execution of update command:
IncomeExample of usage
Given next is an example usage scenario for updating a transaction and explanation of how the update mechanism behaves at each step:
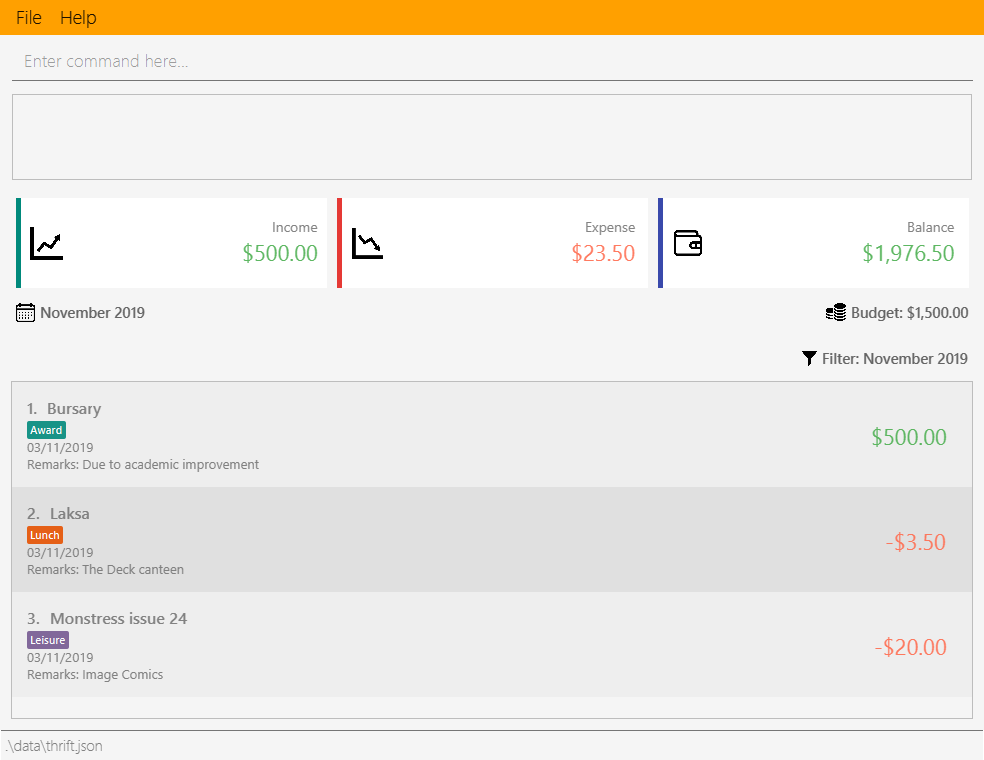
Step 1. The user starts up the application with an initial list loaded from external storage file. The diagram here depicts the example list used throughout this scenario.
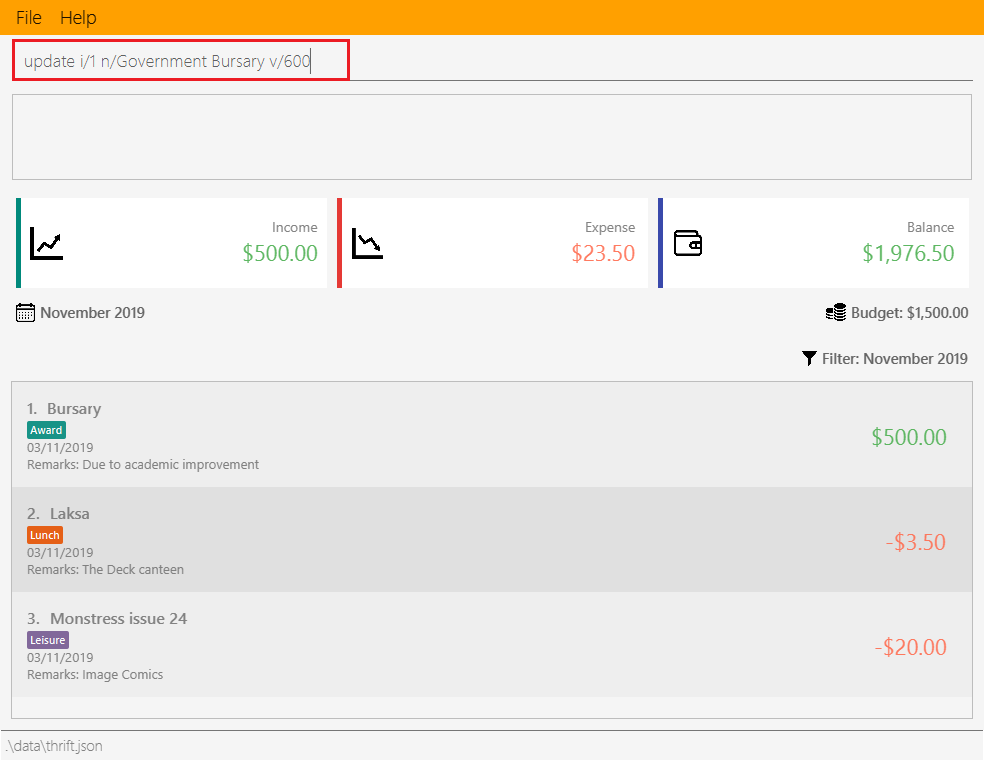
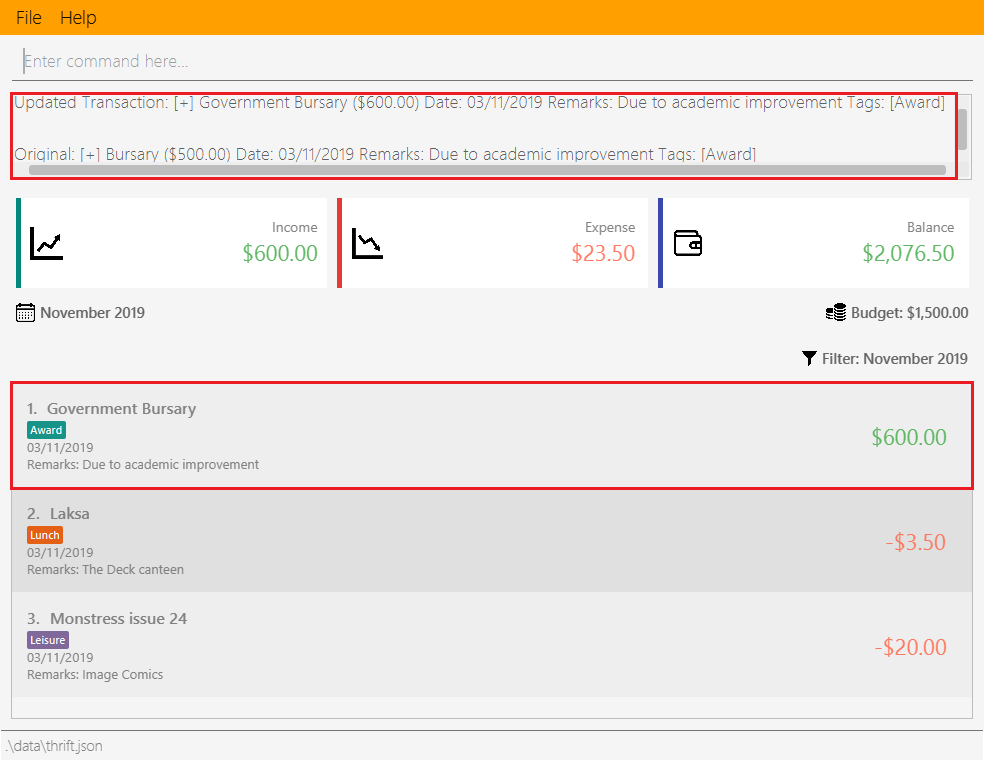
Step 2. The user inputs update i/1 n/Government Bursary v/600 to update the 1st transaction’s name to "Government
Bursary" and value to "600". Input is parsed by UpdateCommandParser#parse() which creates an UpdateCommand.
The 1st transaction specified here is an Income.
|
Step 3. UpdateCommand#execute() creates a new transaction that reflects the changes and gets the index of current
transaction to be updated.
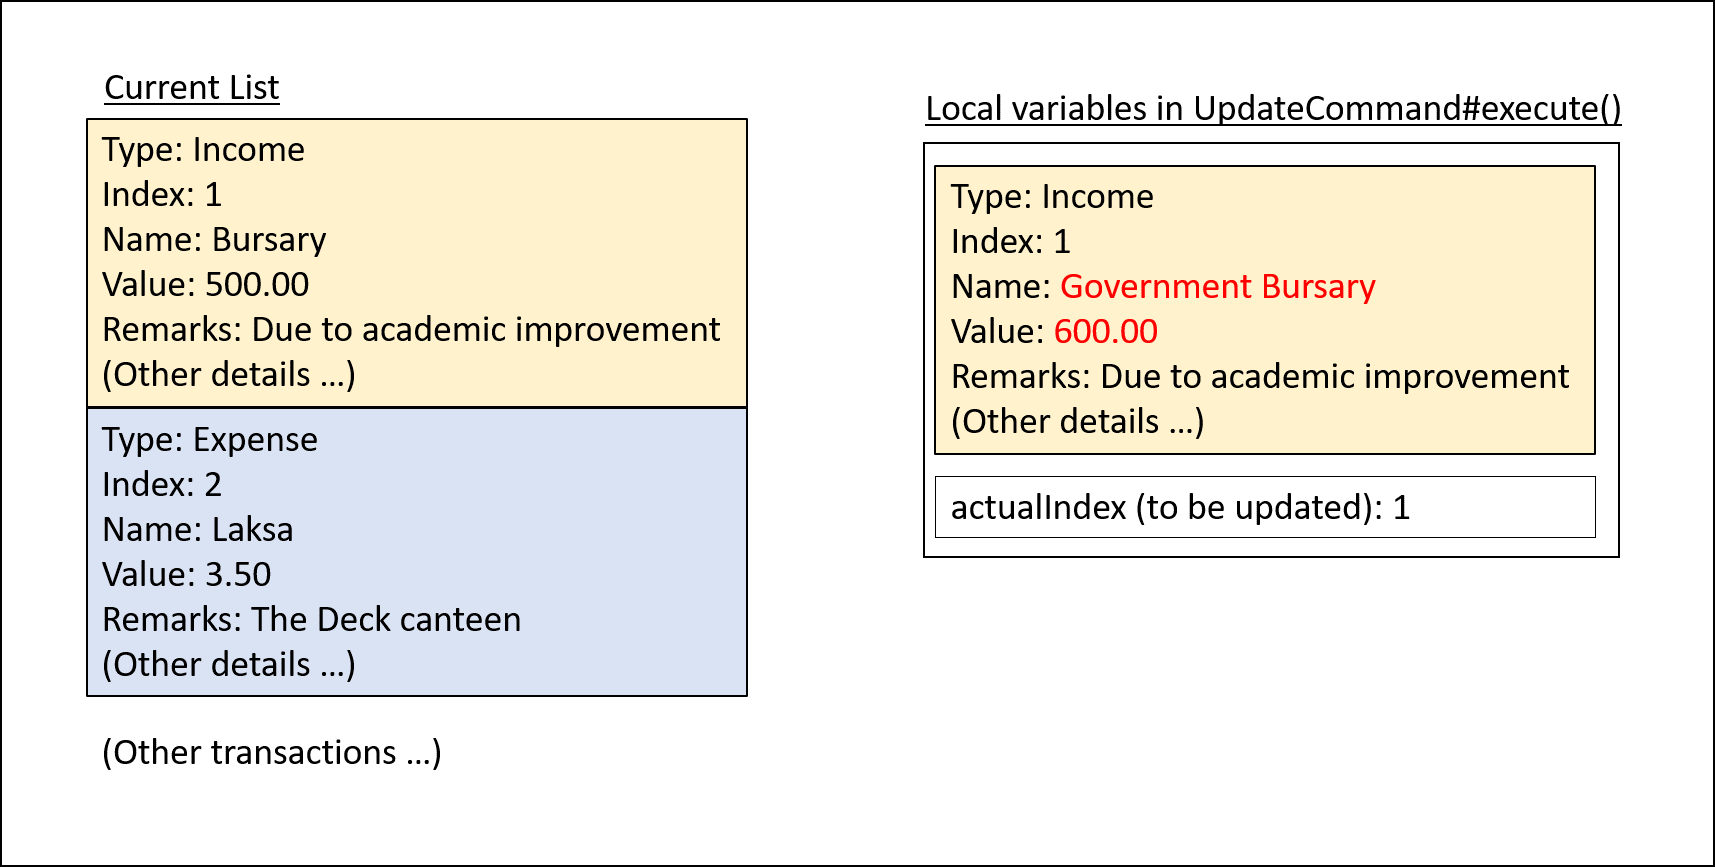
UpdateCommand#execute()Step 4. UpdateCommand#execute() replaces original transaction in the list with the updated transaction.
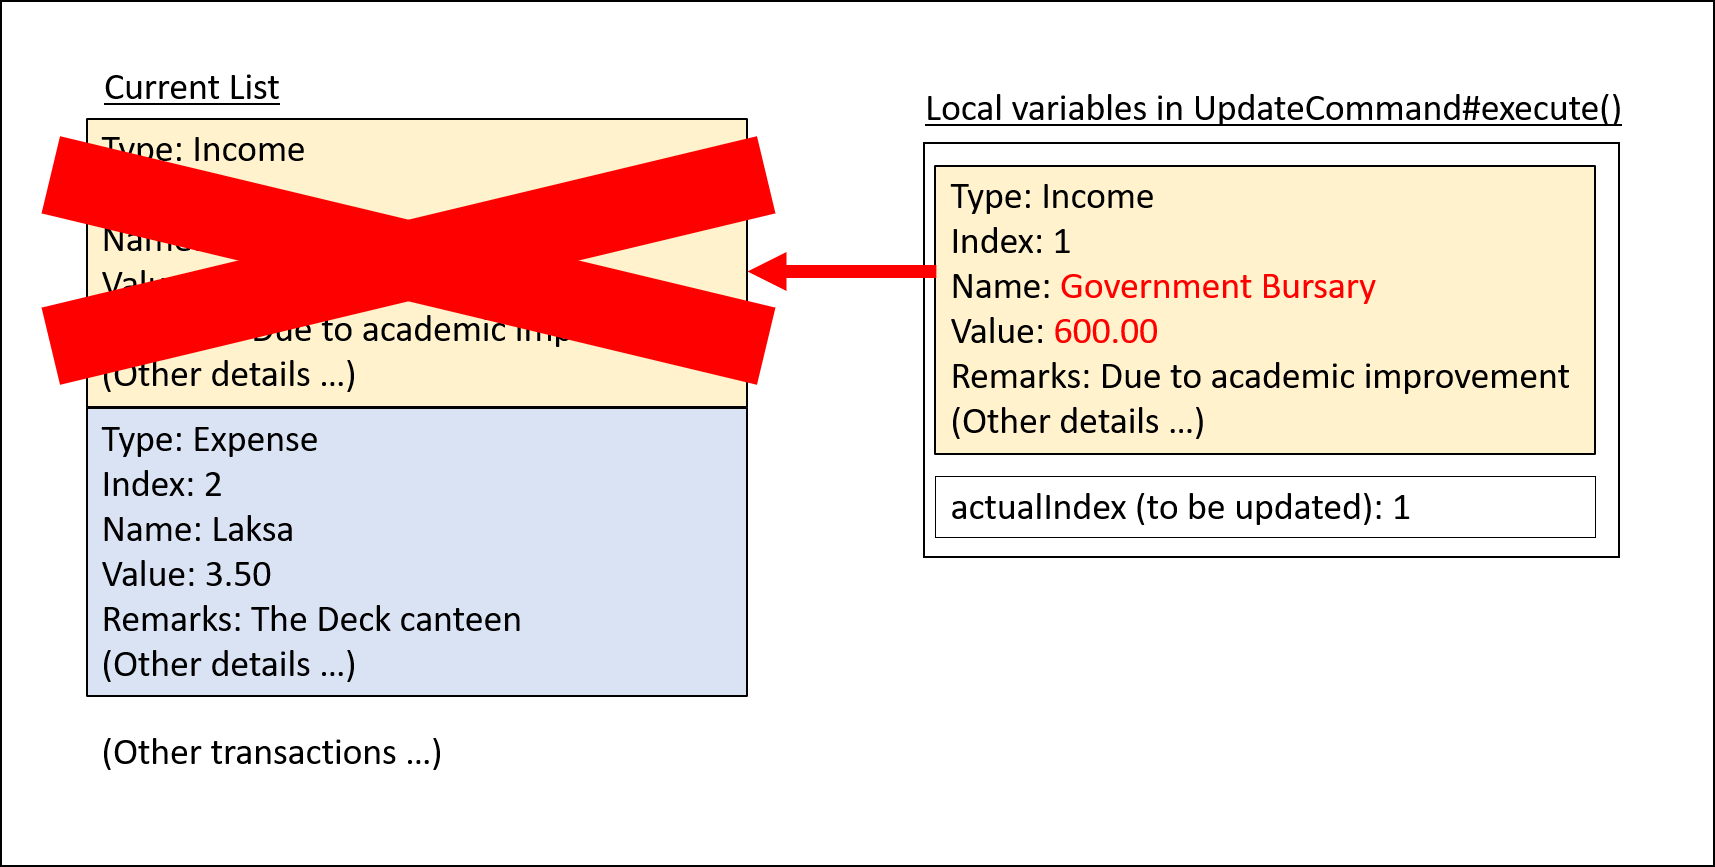
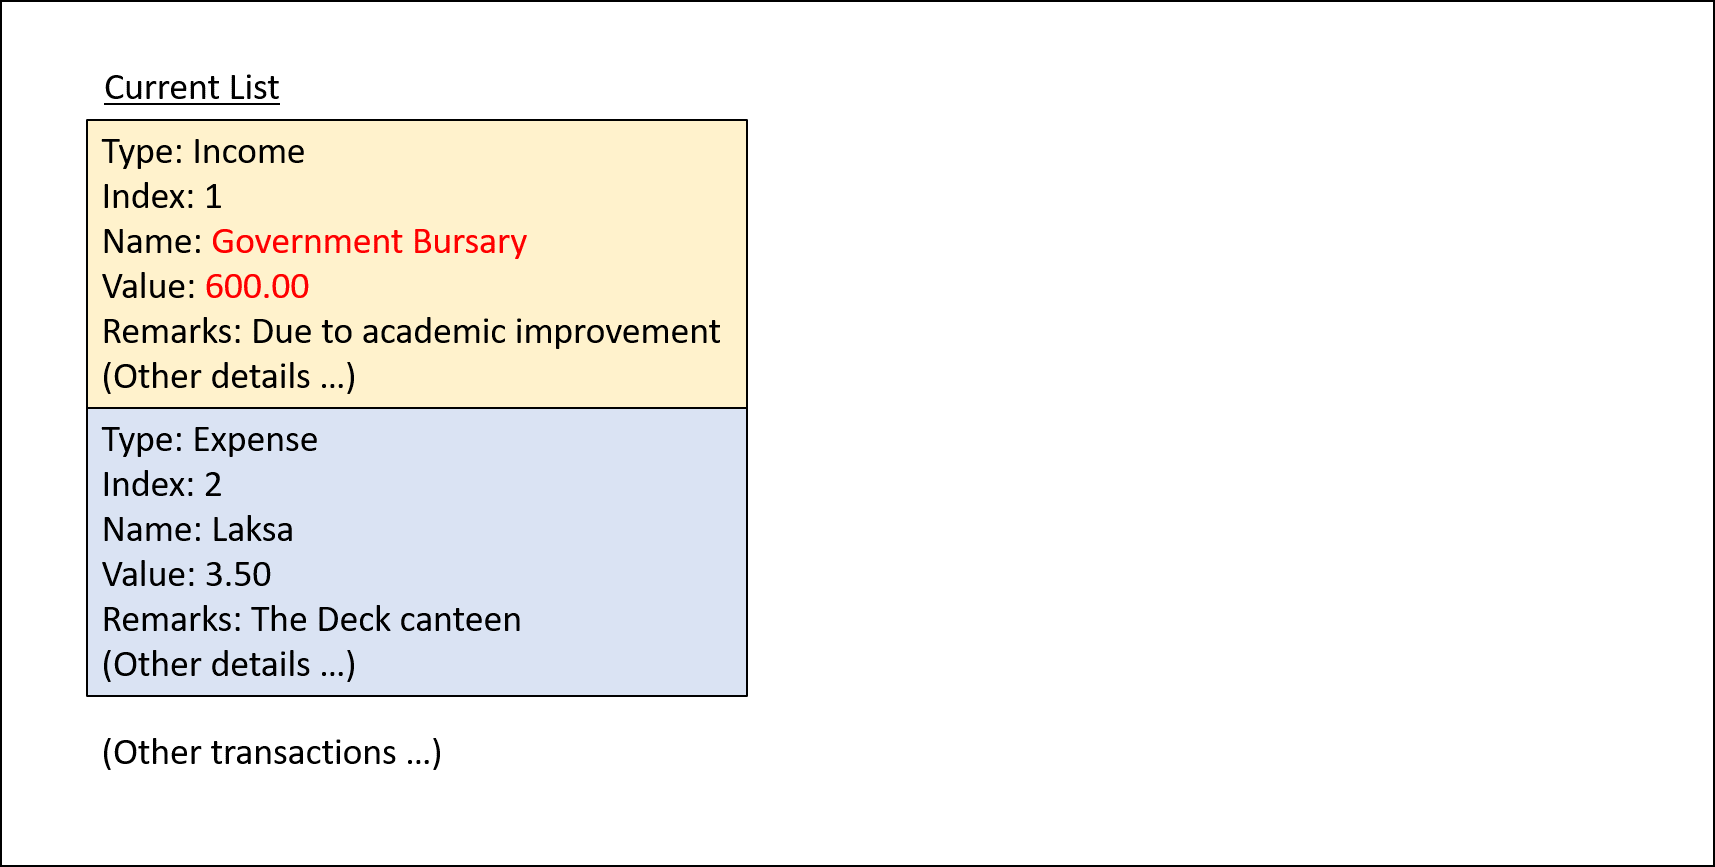
UpdateCommand#execute()The following code snippet from UpdateCommand#execute() shows the creation of an updated transaction and the
replacement of the original transaction with the updated one:
// updateTransactionDescriptor is a class containing details to be contained by the new updated transaction.

transactionToUpdate = lastShownList.get(index.getZeroBased());

// ...Status message code omitted...

updatedTransaction = createUpdatedTransaction(transactionToUpdate, updateTransactionDescriptor);

// ...Logging and status message code omitted...

actualIndex = model.getIndexInFullTransactionList(transactionToUpdate).get();
model.setTransactionWithIndex(actualIndex, updatedTransaction);
Execution shown to user
The following activity diagram gives an overview of what THRIFT shows the user when executing update command:
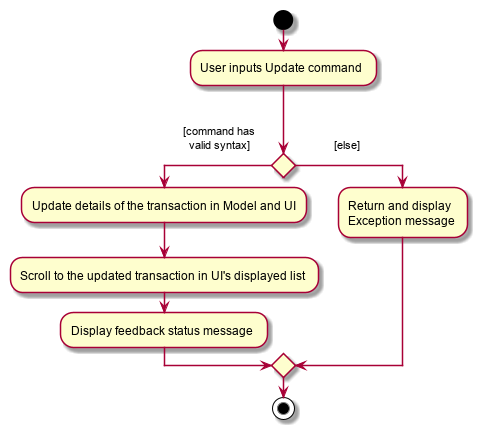
4.4.2. Design considerations
This subsection explores some alternative designs considered for certain aspects of the feature’s implementation.
Aspect: Modifying details of a transaction
-
Alternative 1 (current choice): Replace the original transaction with a new updated transaction.
-
Pros: Easy to implement and keep track of new objects containing new details.
-
Cons: Incurs overhead when creating new instance of
Transaction.
-
-
Alternative 2: Modify the transaction directly using setter methods.
-
Pros: Easy to implement and highly efficient.
-
Cons: Allowing modification of transactions violates immutability principle, possibly resulting in bugs for UI or accessing modified transaction fields if there is delay in updating.
-
Alternative 1 chosen to maintain better coding practices and keep transactions immutable for the entire project.
Overhead of creating new Transaction object not a significant factor as it is not a very large object.
Aspect: Method of replacing original transaction with updated version
-
Alternative 1 (current choice): Get the index of original transaction in the transactions list and
setupdated transaction to that index.-
Pros: High level of certainty that updated transaction replaces the correct outdated transaction and occupies the correct index in the list. Highly efficient.
-
Cons: A little more coding required to get the index of original transaction.
-
-
Alternative 2: Iterate through the transactions list and directly set the updated transaction at the first instance of original transaction found.
-
Pros: Under the assumption that each
Transactionis unique, index to replace can be easily found by iterating through the list with a simple loop. -
Cons: Efficiency decreases as transactions list size increases. If transactions not unique, incorrect transaction may be replaced if a transaction identical to the one supposed to be replaced is found earlier in the list.
-
4.5. Cloning transactions
The clone feature creates one or more duplicates of a specified Transaction and adds them to the end of the
existing transactions list.
4.5.1. Implementation
An Index and Occurrence are obtained from their representation in user input. The Index specifies
which transaction to clone, while the Occurrence informs THRIFT how many clones of the transaction should be
created (Occurrence#numOccurrences) and the time period between them (Occurrence#frequency).
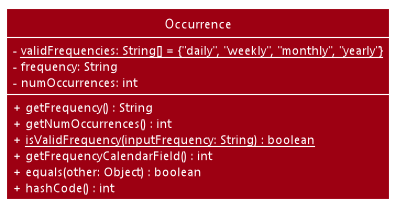
Here is a Class Diagram for the implementation of Occurrence:
Occurrence classThe clone functionality is facilitated by common Logic operations and classes for commands, with
feature-specific classes CloneCommand in place of Command, and CloneCommandParser.
The following methods are concrete implementations unique to clone:
-
CloneCommandParser#parse()- Parses user input to extract anIndexand create anOccurrence, then passes them as parameters to a newCloneCommandfor execution. -
CloneCommand#execute()- Adds one or more identical copies of specifiedTransactiontoModel, then returns aCommandResult(Step 4 of Logic).
The following sequence diagram illustrates clone command execution:
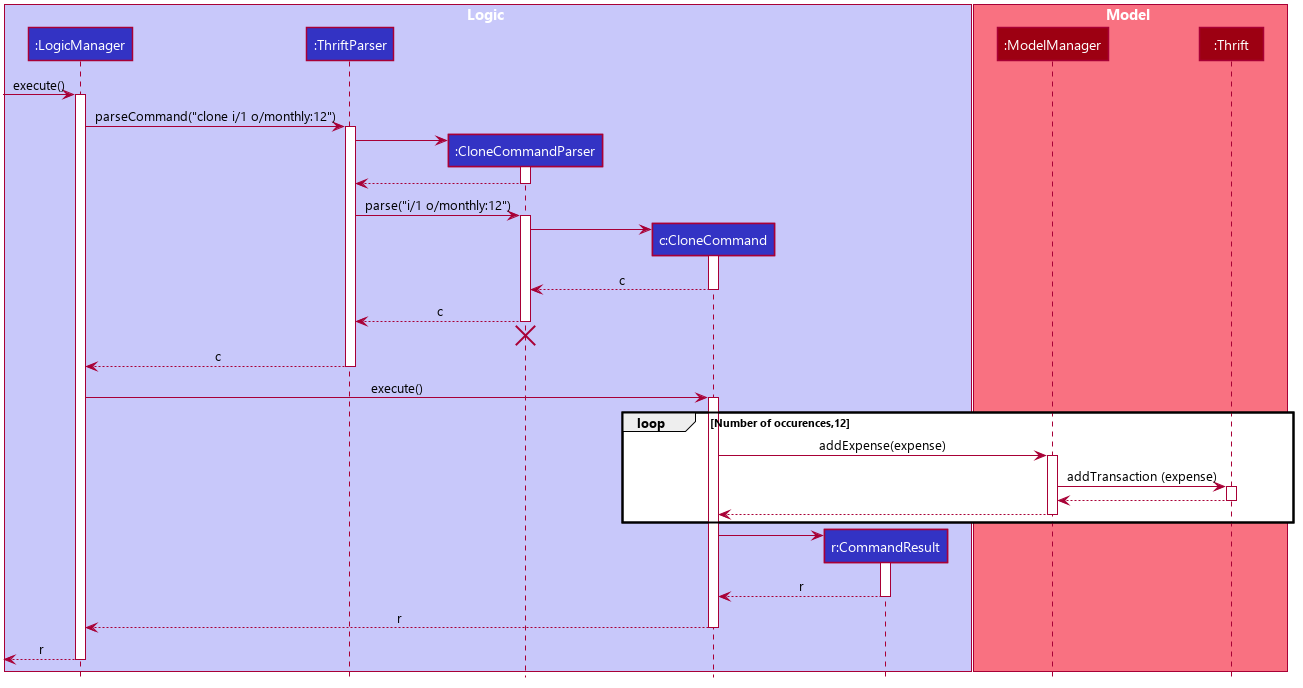
ExpenseExample of usage
Given next is an example usage scenario for cloning a transaction and explanation of how the clone mechanism behaves at each step:
| This entire scenario uses the list of all transactions. |
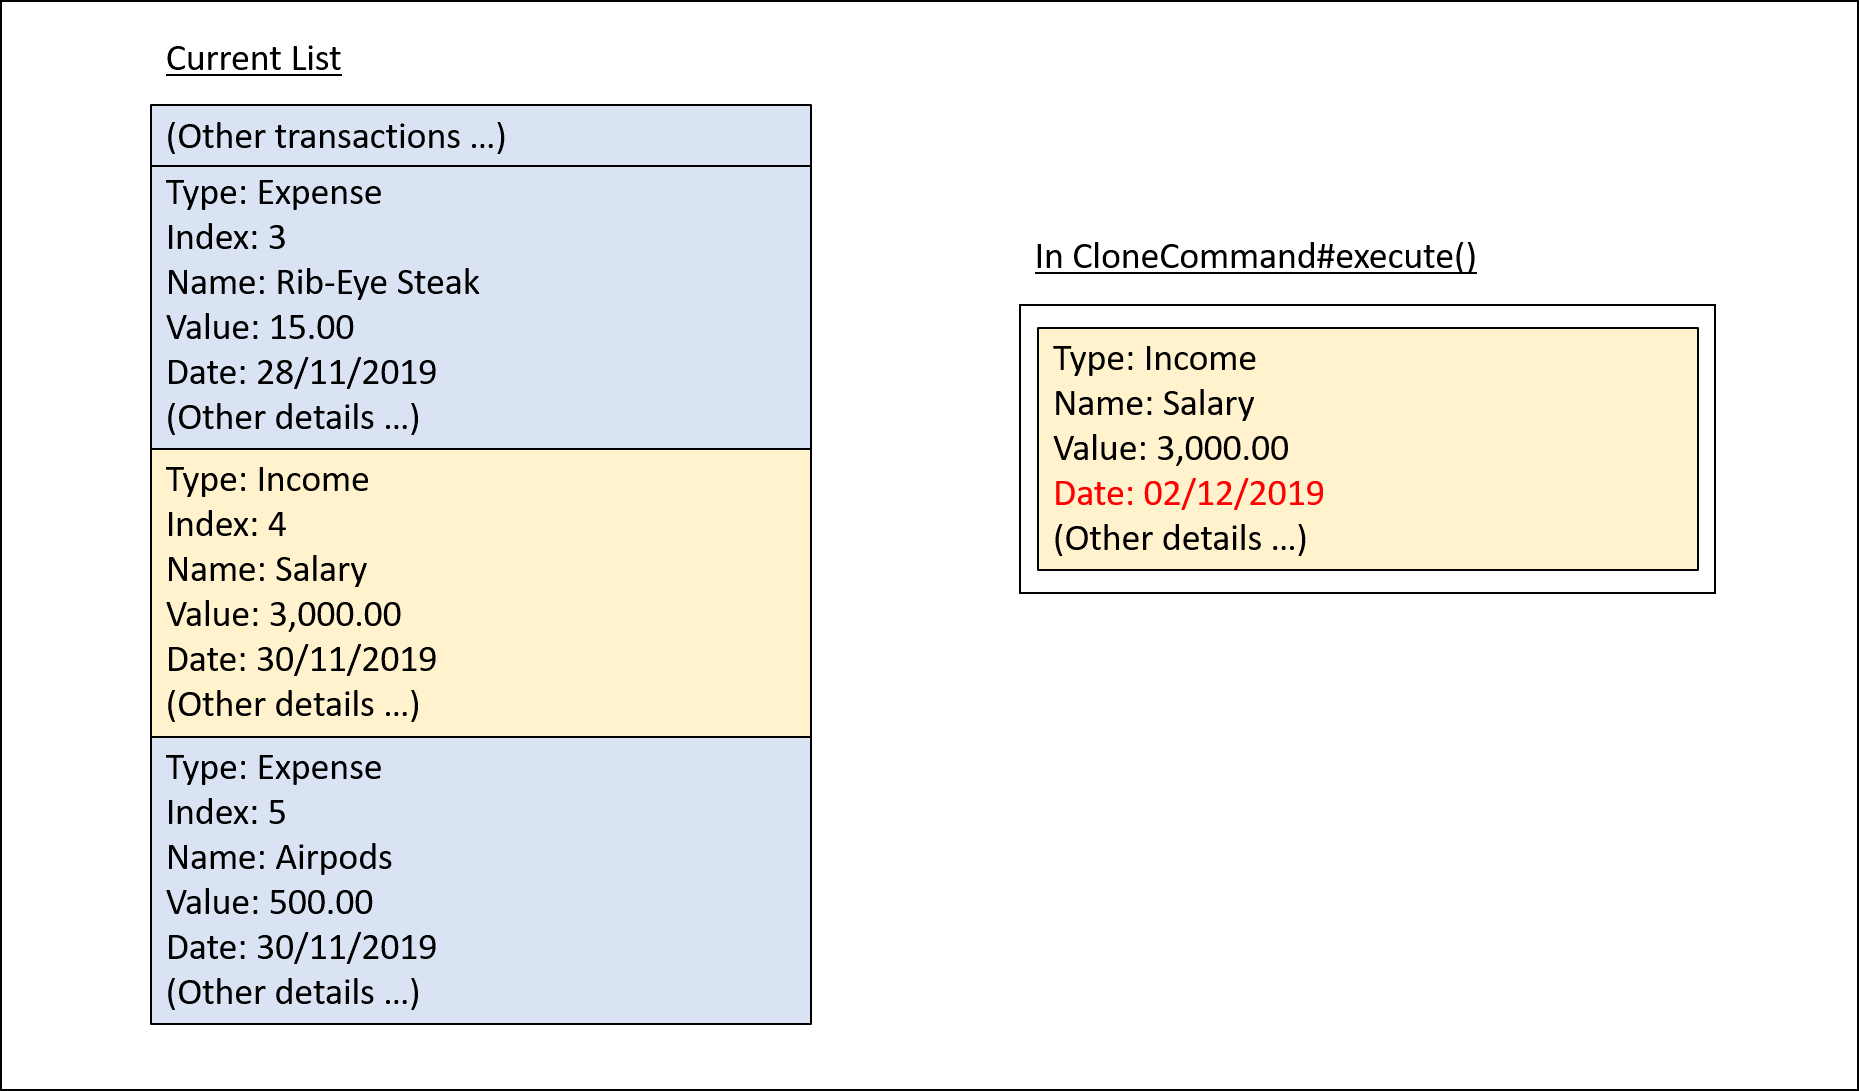
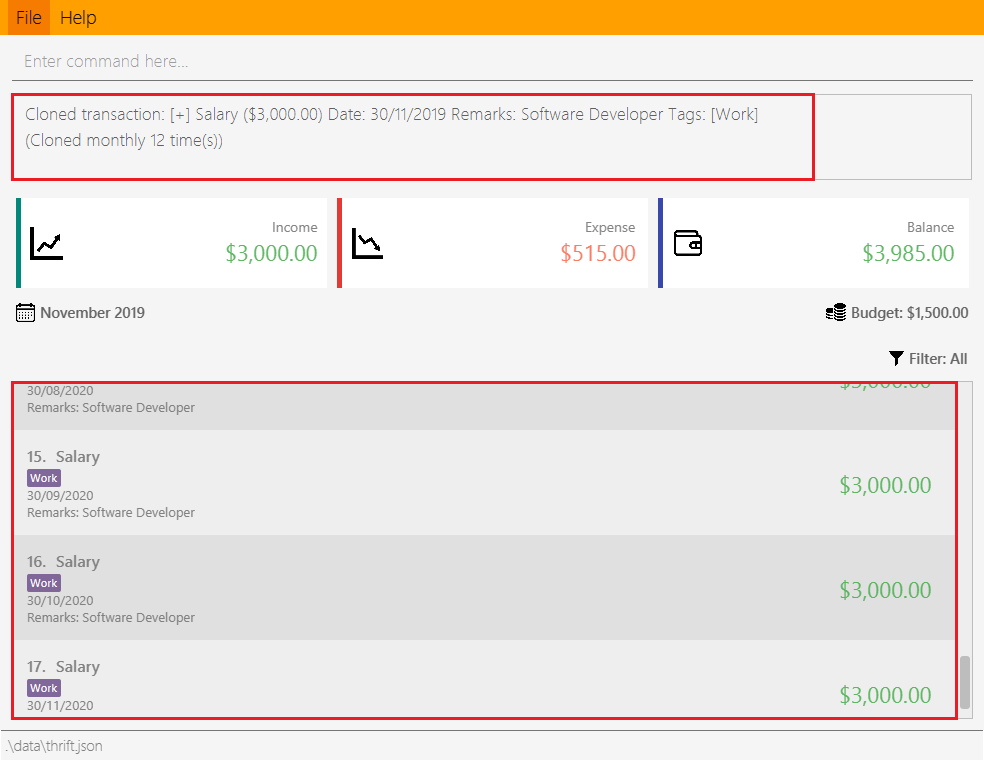
Step 1. The user starts up the application with an initial list loaded from external storage file. The diagram here depicts the example list used throughout this scenario. In particular, this example will observe the cloning of the transaction at index 4.

Step 2 (i). The user inputs clone i/4 or clone i/4 o/daily:0 to create 1 copy of the transaction at index 4 on the date when command is called - for this example, current date when command is used is 02/12/2019.
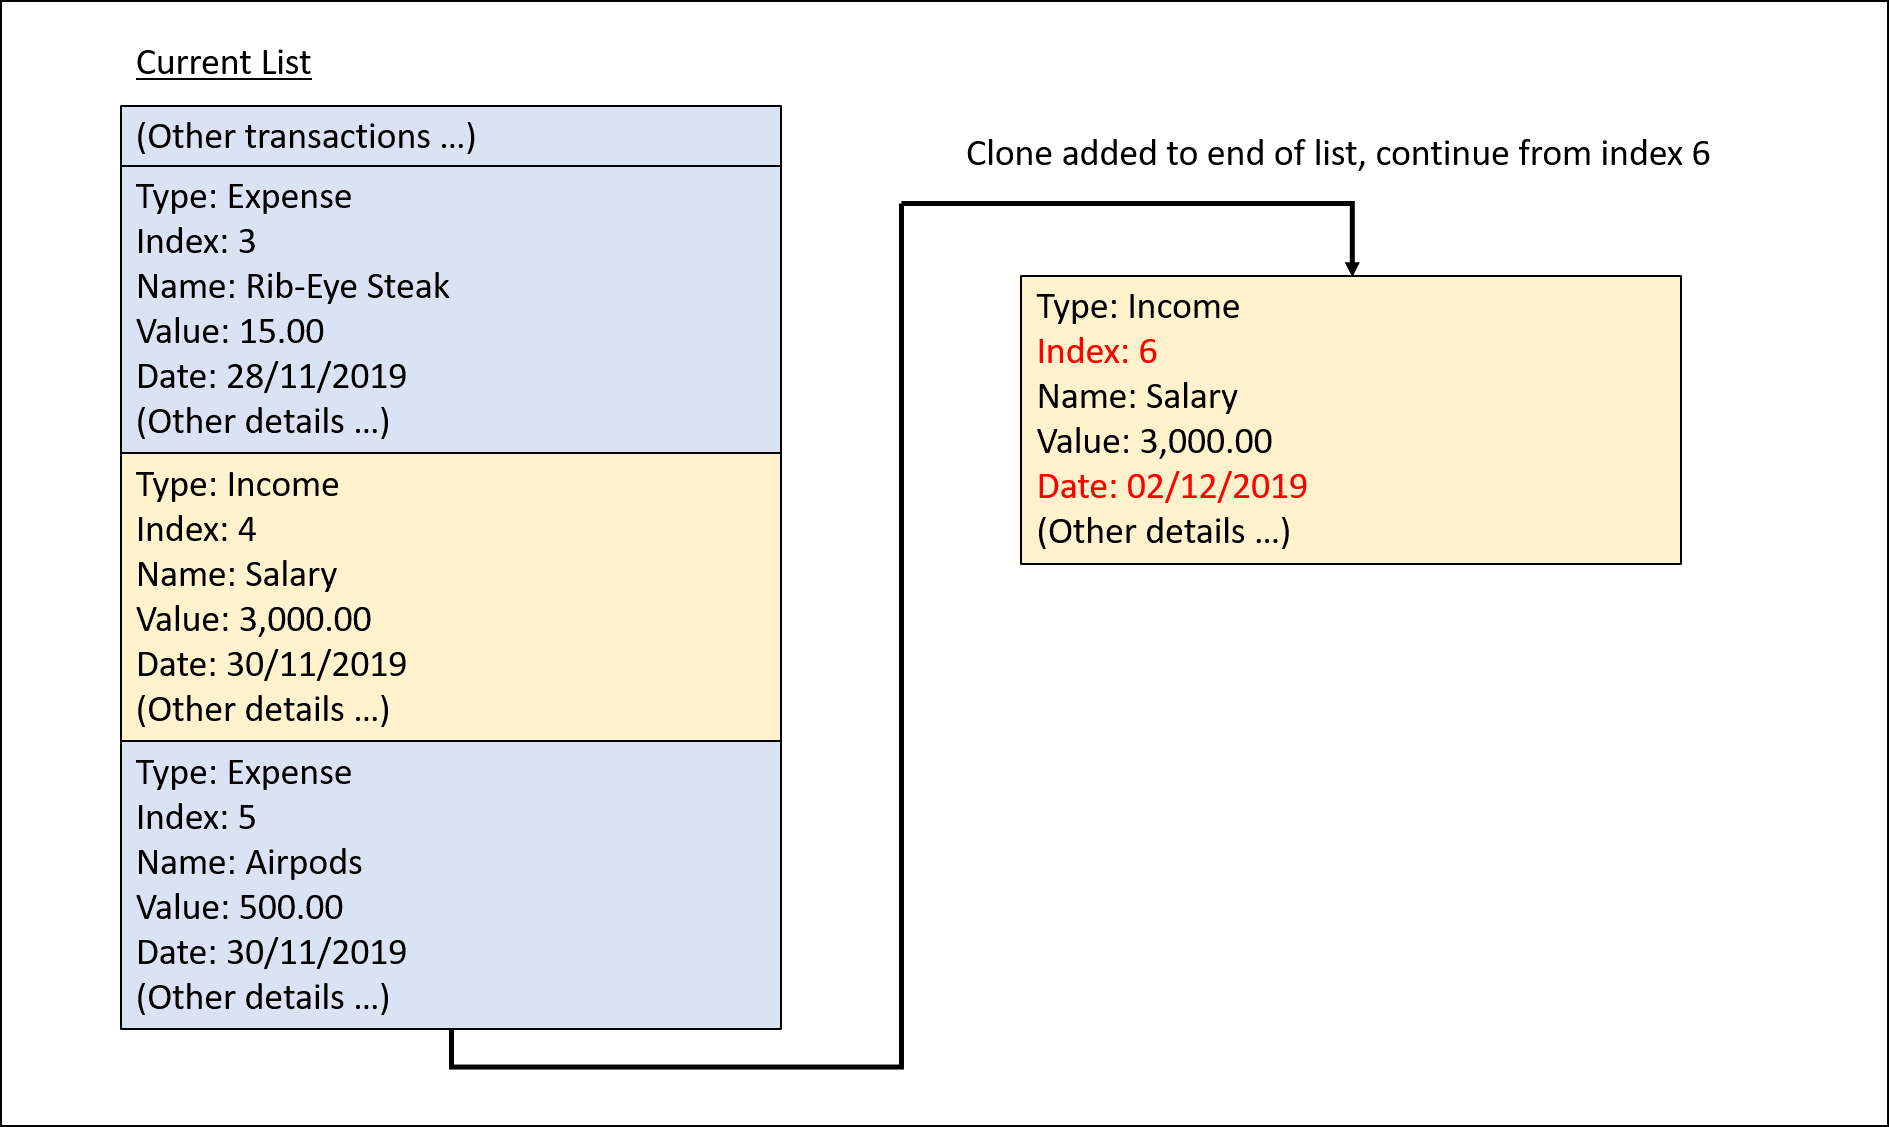
Step 2 (ii). The user removes the clone created in Step 2 (i) using delete i/6 command.
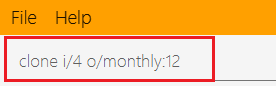
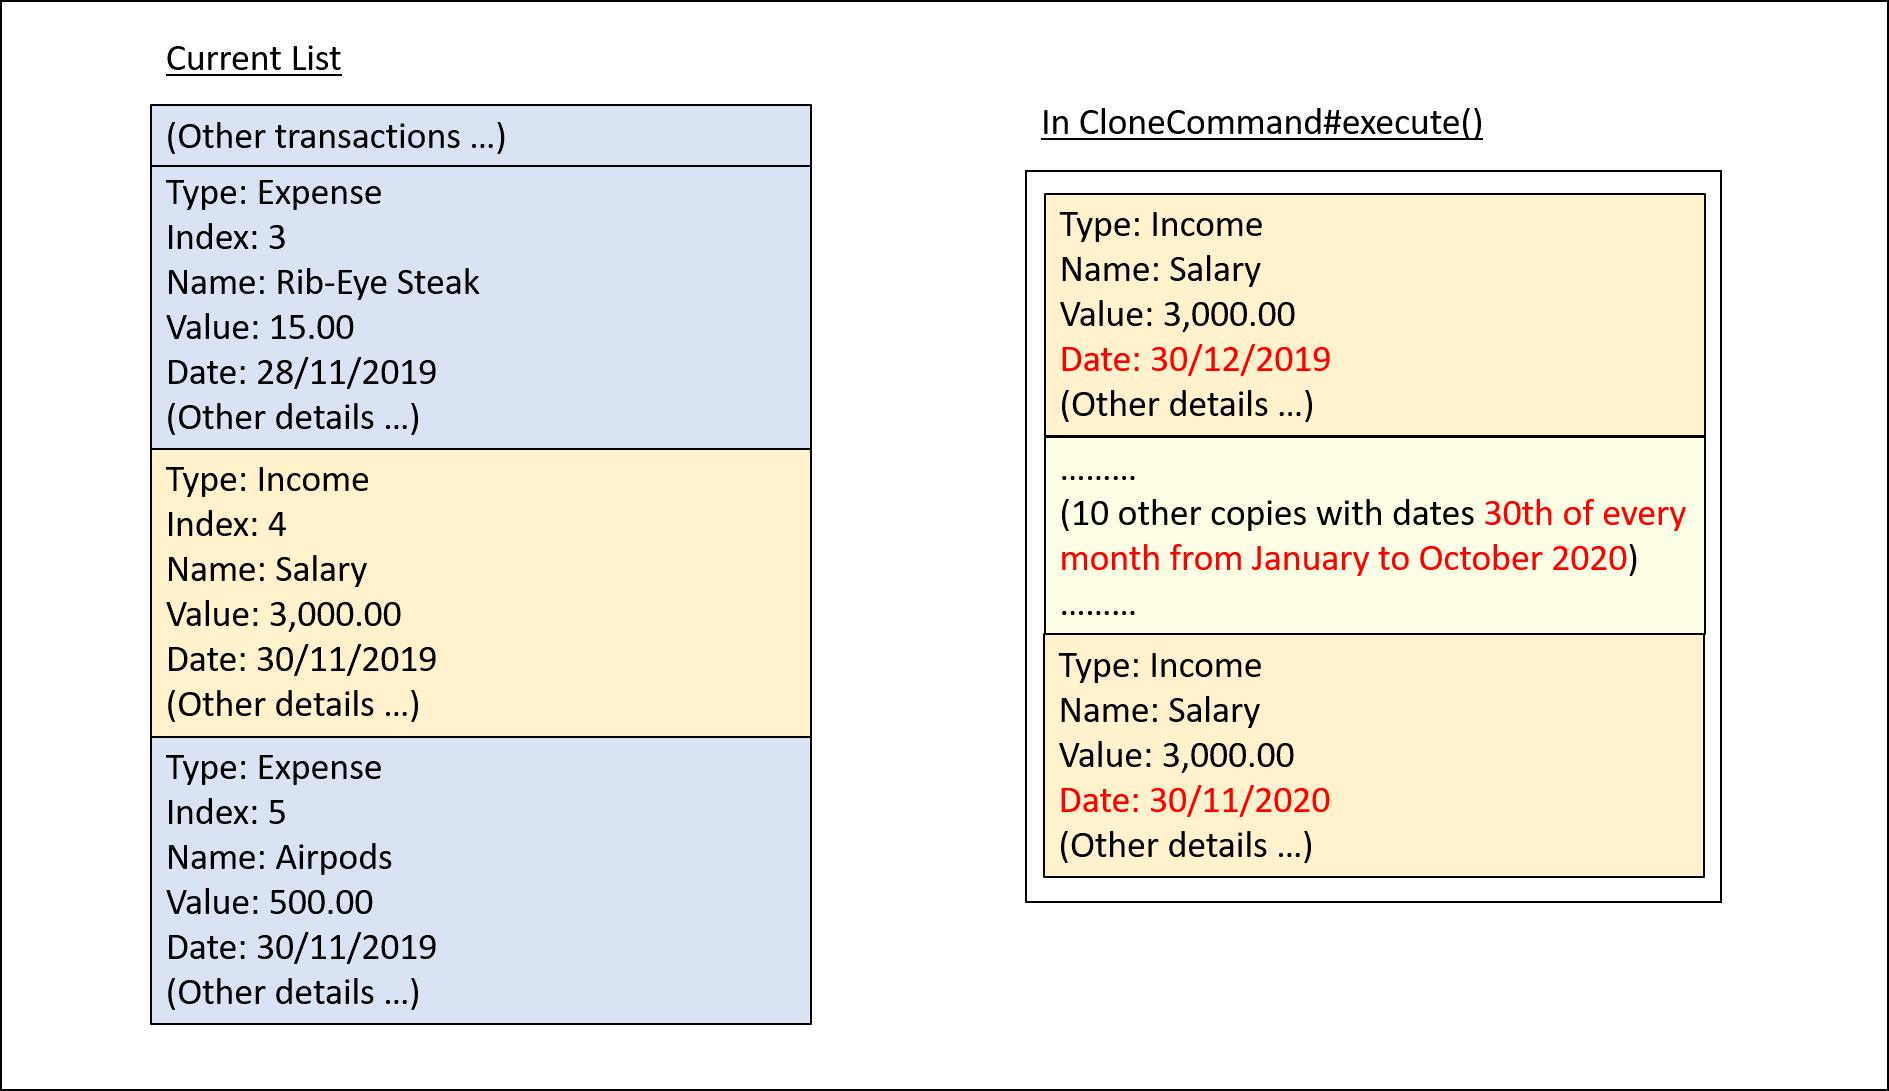
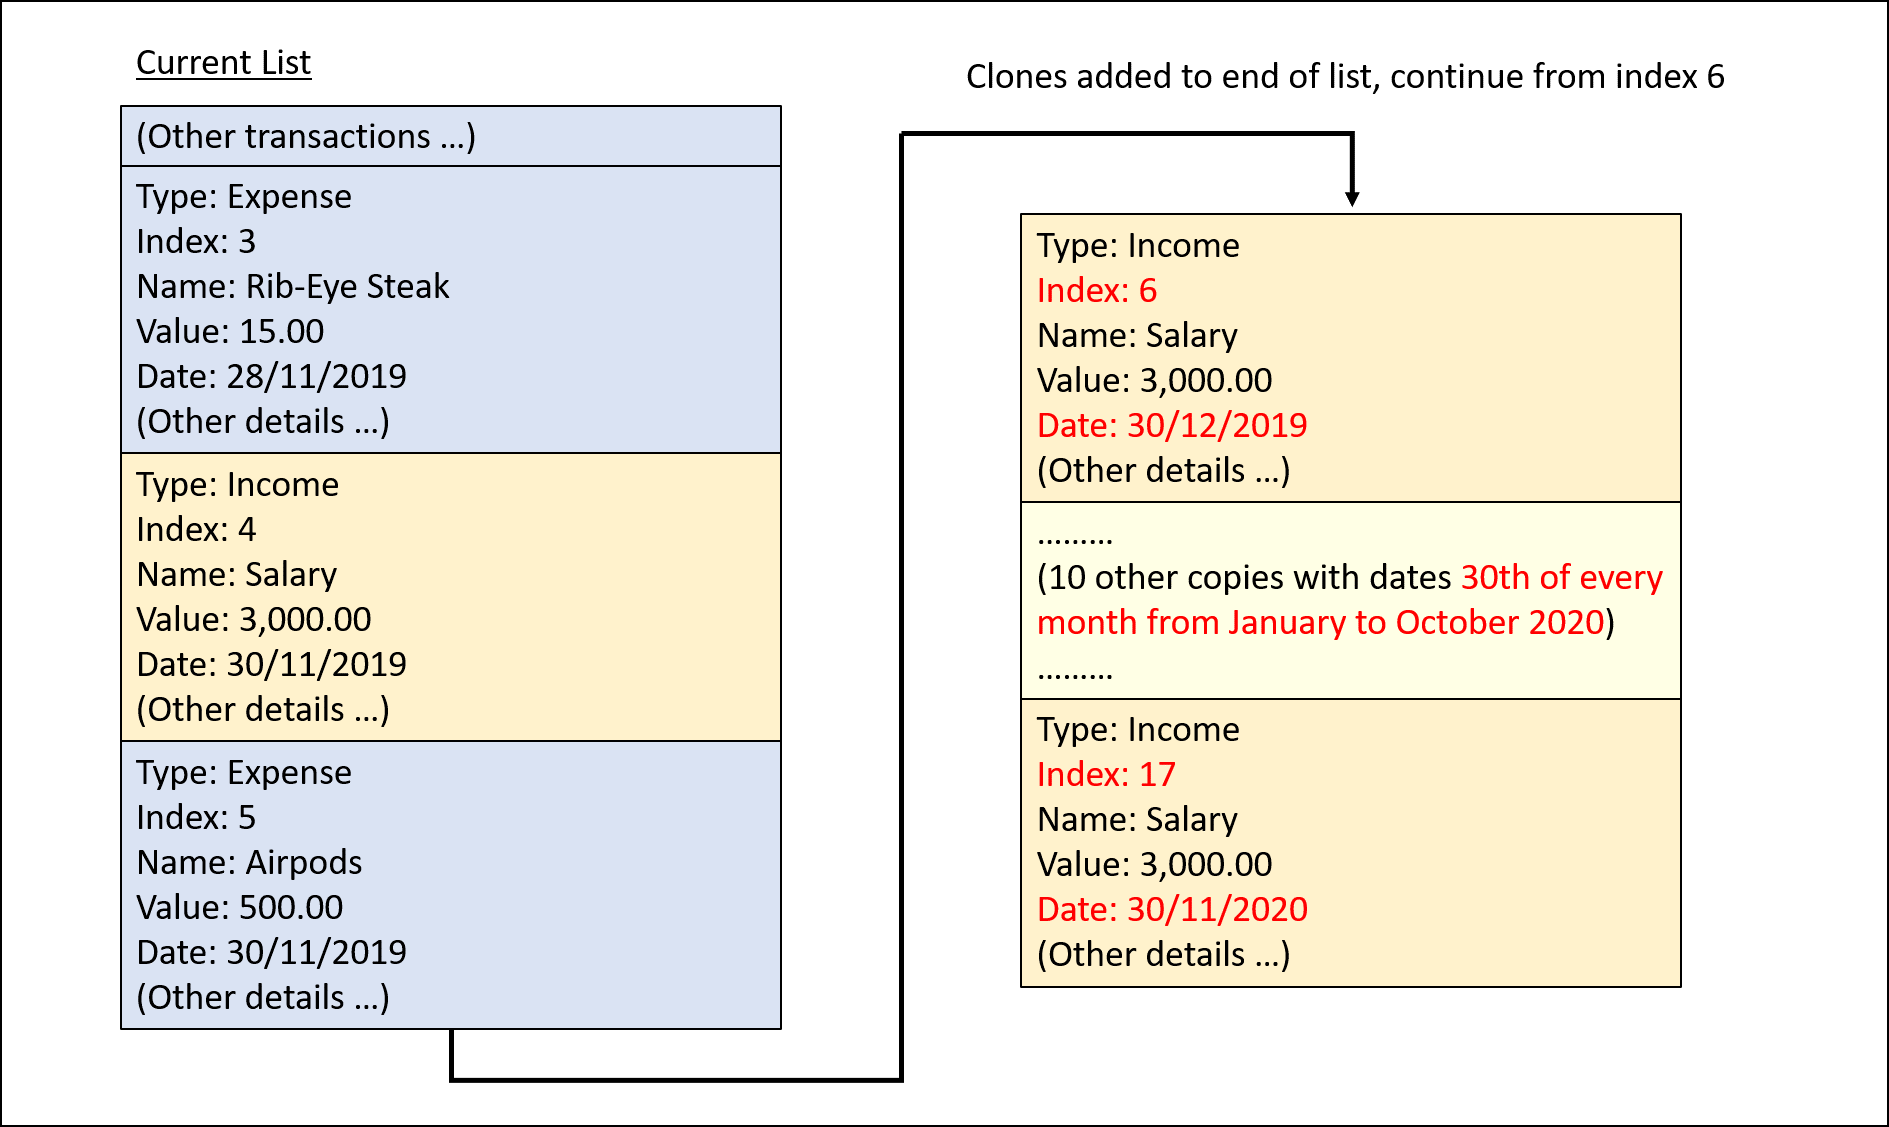
Step 3. The user inputs clone i/4 o/monthly:12 to create 12 copies of the transaction at index 4 with dates one
month apart from each other (30/12/2019 to 30/11/2020), and add them to the list. Input is parsed by
CloneCommandParser#parse() which creates a CloneCommand.
Step 4. CloneCommand#execute() creates copies of the transaction to be cloned with their dates of occurrence set one
month apart. The copies are then added to the list.
Execution observed by user
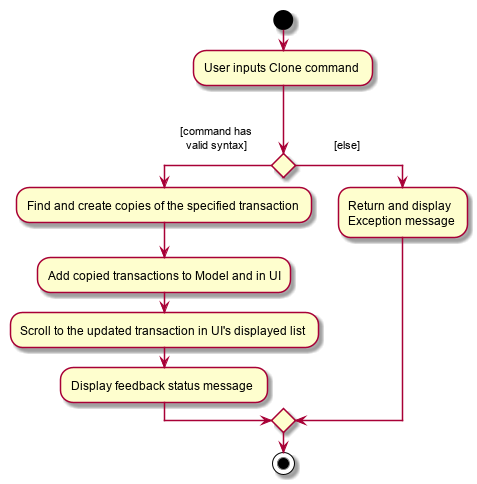
The following activity diagram gives an overview of what the user observes when executing clone command:
4.5.2. Design considerations
This subsection explores some alternative designs considered for certain aspects of the feature’s implementation.
Aspect: Representing occurrences for execution
-
Alternative 1 (current choice): Implement a new class
Occurrenceto represent occurrences.-
Pros: Good Object-Oriented Programming design adhering to principles of abstraction and encapsulation. Utility methods to process occurrences can be kept in a single class.
-
Cons: More code and memory required for entire
Occurrenceclass.
-
-
Alternative 2: Directly pass the results from parsing occurrence representation in user input as parameters to execution methods.
-
Pros: Quick and efficient in producing parameters for execution.
-
Cons: May be complicated to trace parameters when passing between different methods. Unable to implement utility methods to process occurrences within a single class.
-
Aspect: Maintaining a store for valid values of Occurrence#frequency
-
Alternative 1 (current choice): Store valid
frequencyvalues within a static non-modifiable "final" array insideOccurrence-
Pros: Implementation is simple with relatively little coding needed. Values cannot be modified after initialization of array, preventing invalid values from being added later.
-
Cons: An additional field of type array has to be included in
Occurrenceclass.
-
-
Alternative 2: Store valid values as
Enum-
Pros: Validity of values in
Enumform all but assured, there will never be invalid values. -
Cons: More code and memory required for entire
Enumclasses.
-
4.6. Undo/Redoing undoable commands
UndoCommand allows the user to revert THRIFT to its previous state when they have made a mistake. RedoCommand does
the opposite of UndoCommand, useful for when users change their minds.
The underlying data structure of the undo and redo feature is implemented in PastUndoableCommands. It consists of two stacks:
UndoStack and RedoStack. It provides the following methods:
-
PastUndoableCommands#addPastCommand(Undoable undoable)— Keeps track of the undoable command objects. -
PastUndoableCommands#getCommandToUndo()— Retrieves undoable command object fromUndoStackto perform undo. -
PastUndoableCommands#hasUndoable()— Checks if there is any undoable command object to perform undo. -
PastUndoableCommands#getCommandToRedo()— Retrieves undone command object fromRedoStackto perform redo. -
PastUndoableCommands#hasRedoCommand()— Checks if there is any undone command object to perform redo.
The function wrappers to these methods are Model#keepTrackCommands(Undoable command), Model#getPreviousUndoableCommand(), Model#hasUndoableCommand(),
Model#getUndoneCommand() and Model#hasUndoneCommand() respectively.
Undoable commands are AddExpenseCommand, AddIncomeCommand, CloneCommand, DeleteCommand, TagCommand, UntagCommand, UpdateCommand, BudgetCommand.
|
Every undoable command object will be stored in the UndoStack once it is executed. It will only be stored in RedoStack when the user executed
undo.
4.6.1. Implementation
The below scenario illustrates how undo and redo feature works:
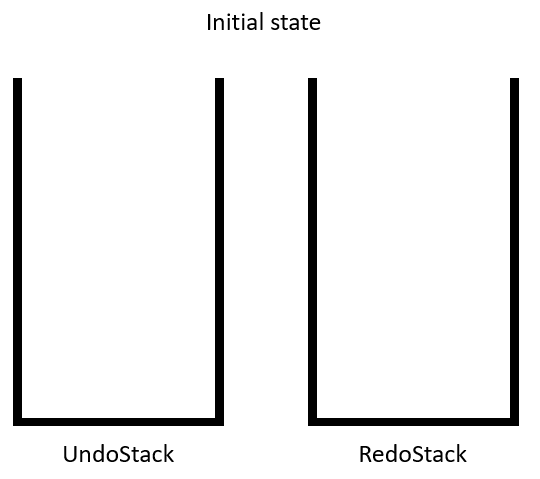
Step 1. The application is launched with an empty transaction list. Both UndoStack and RedoStack are empty upon initializing PastUndoableCommands.
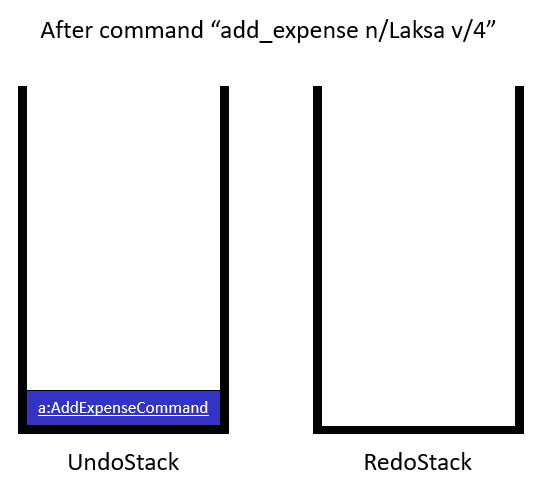
Step 2. The user executes add_expense n/Laksa v/4 to add Laksa to the TransactionList.
The LogicManager invokes the method Model#keepTrackCommands(Undoable undoable) to keep track of the AddExpenseCommand object
that was used to add Laksa. This AddExpenseCommand object is pushed into UndoStack.
Step 3. The user executes undo to remove Laksa from TransactionList.
The UndoCommand invokes the method Model#getPreviousUndoableCommand() to retrieve the AddExpenseCommand object.
AddExpenseCommand is popped from UndoStack and pushed into RedoStack before being returned to the callee.

The sequence diagram shows how undo works for AddExpenseCommand:

UndoCommand is applied at the back-endA general sequence diagram to illustrate how undo works for undoable commands:
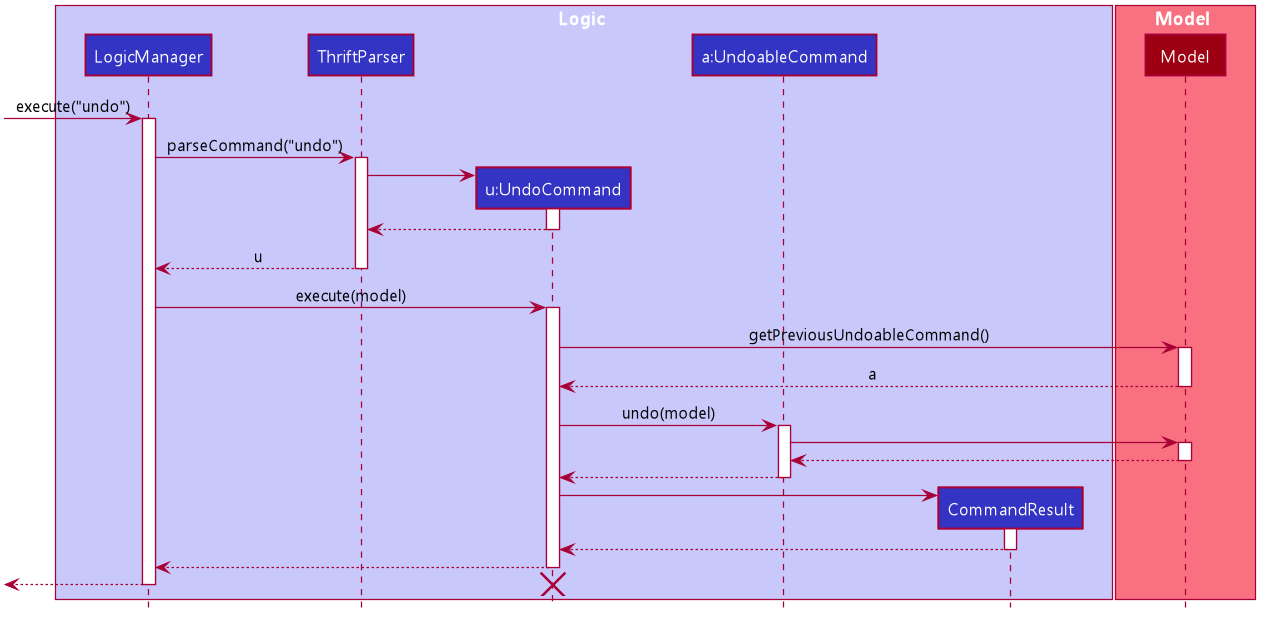
UndoCommand is applied at the back-end for undoable commandsStep 4. The user executes redo to add Laksa back to TransactionList.
The RedoCommand invokes the method Model#getUndoneCommand() to retrieve the AddExpenseCommand object.
AddExpenseCommand is popped from RedoStack and pushed into UndoStack before being returned to the callee.
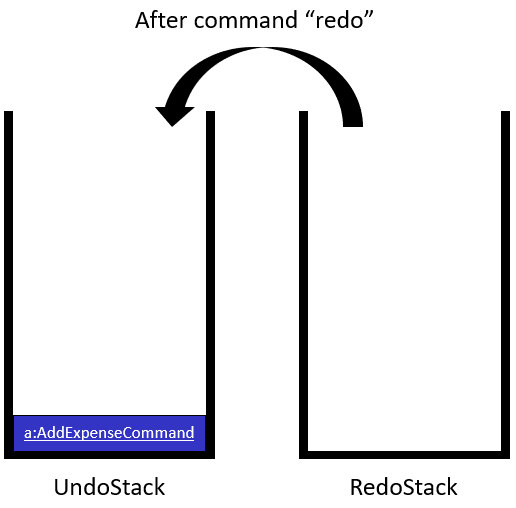
All undoable commands objects stored in RedoStack are purged when the user executes another undoable command.
|
The sequence diagram shows how redo works for AddExpenseCommand:
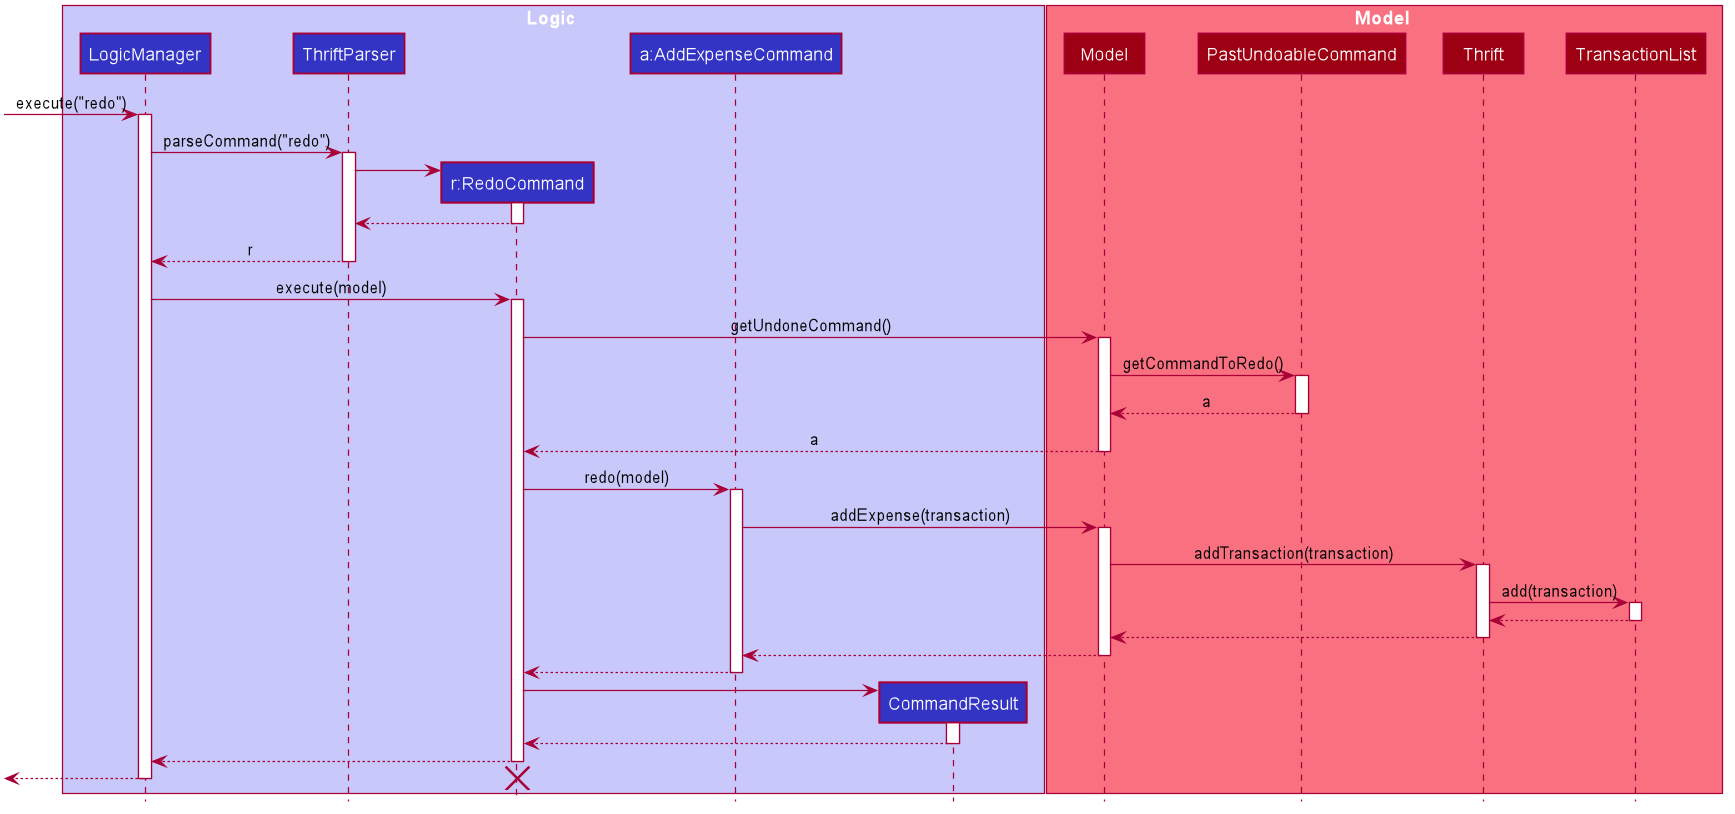
RedoCommand is applied at the back-endA general sequence diagram to illustrate how redo works for undoable commands:

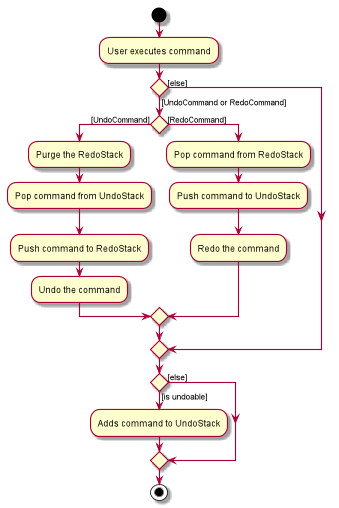
RedoCommand is applied at the back-end for undoable commandsThe following activity diagram shows what happens if the user executes a command:
4.6.2. Design considerations
This section shows some of the design considerations taken when implementing the undo and redo features.
Aspect: Algorithm used to implements undo and redo features
-
Alternative 1 (current choice): Provides different implementations for each command so that the command knows how to undo and redo itself.
-
Pros: Requires less memory usage and provides better performance.
-
Cons: Needs to ensure that the implementation for each command is correct.
-
-
Alternative 2: Saves the current version of the
THRIFTdata. When undo/redo is executed,THRIFTwill use the previous version of the data.-
Pros: Reuses the same implementation for the new commands.
-
Cons: Requires a large amount of memory usage.
-
Alternative 1 was chosen because it requires less memory usage and has better performance compared to alternative 2. For example, undo
an AddExpenseCommand, alternative 1 requires a time complexity of O(1), whereas alternative 2 requires a time complexity of O(N).
Aspect: Data structure used to keep track of undoable command
-
Alternative 1 (current choice): Use two stacks. One stack stores the command to undo while the other stack stores the command to redo.
-
Pros: Makes the implementation easy to code.
-
Cons: Needs to manage the two stacks carefully. For example, you need to pop the command from one stack and push it into another stack.
-
-
Alternative 2: Use a list and a pointer to indicate the next command to undo.
-
Pros: Makes the implementation easy to code.
-
Cons: Needs to manage the pointer carefully. For example, you need to ensure that the pointer stays within the size of a list.
-
Alternative 1 was chosen because it provides a higher level of abstraction. Alternative 2 is using a list to implement a stack.
4.7. Filtering transactions
The List command allows the user to bring up a list of Transactions, and filter it by month.
This feature is implemented by using a Predicate<Transaction> to filter the Transactions by month.
4.7.1. Implementation
ListCommand is instantiated by ListCommandParser#parse(String args),
which attempts to parse the various parameters supplied in args and return a ListCommand object.
The sequence diagram below shows how the execution of the list is like:
The following conditions will cause a ParseException to be thrown by the parser:
-
Incorrect syntax (i.e. having a prefix that does not refer to month)
-
Illegal values in parameters (i.e. special characters and symbols entered for a integer-only field)
| If the user input is incorrect due to the reasons above, the usage or parameter syntax will be shown. |
The scenario below shows an example of how the feature works:
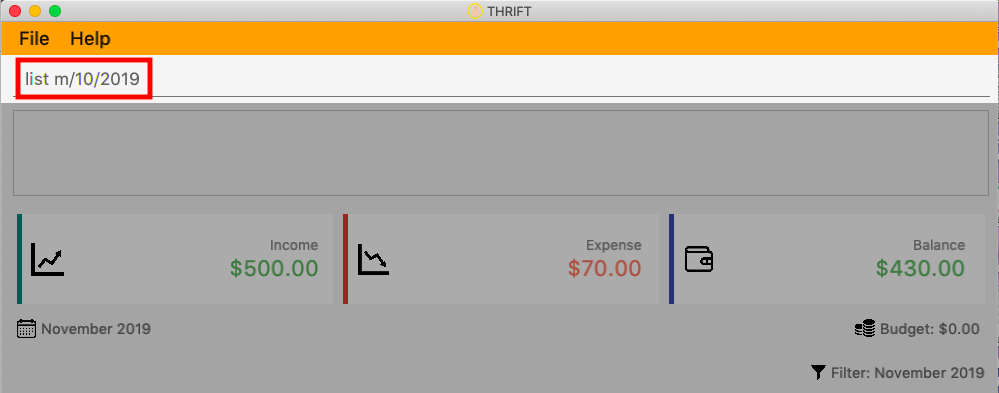
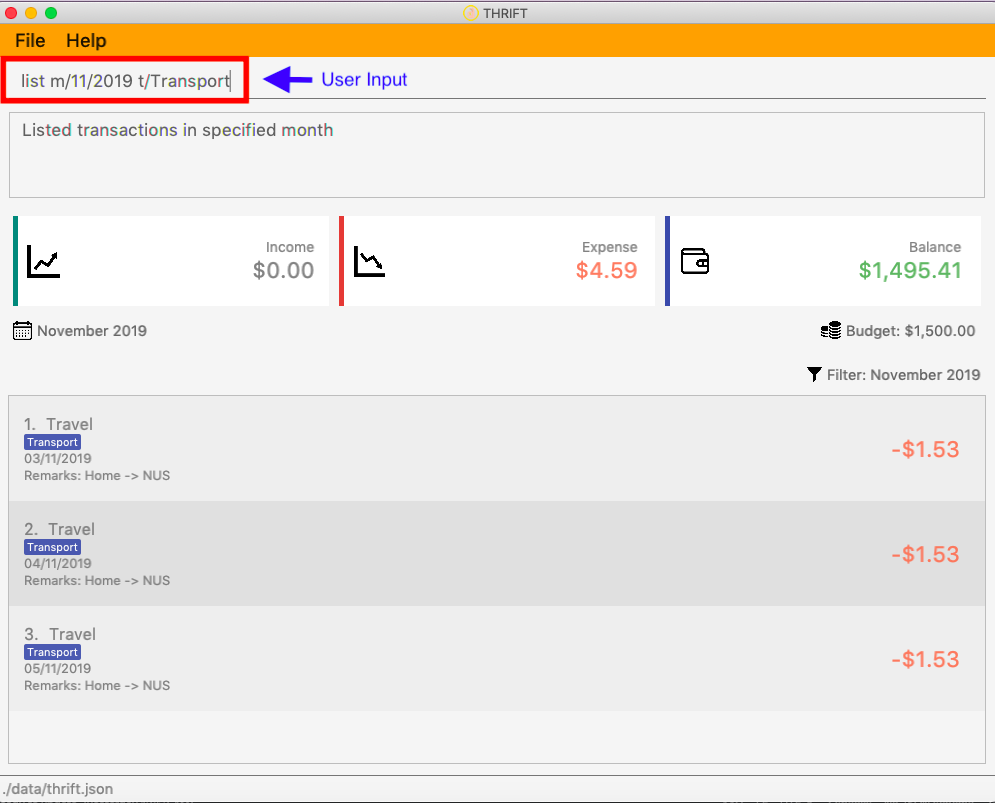
Step 1. The user executes list m/10/2019 to filter the list to bring up transactions of October 2019.
Step 2. The ListCommandParser will parse the arguments using the method ListCommandParser#parse(String args).
Step 3. Since user input is correct and the arguments have been parsed, a new ListCommand object will be created by the
ListCommandParser.
Step 4. This ListCommand object will use a Predicate based on the specified month which is used to filter through each Transaction.
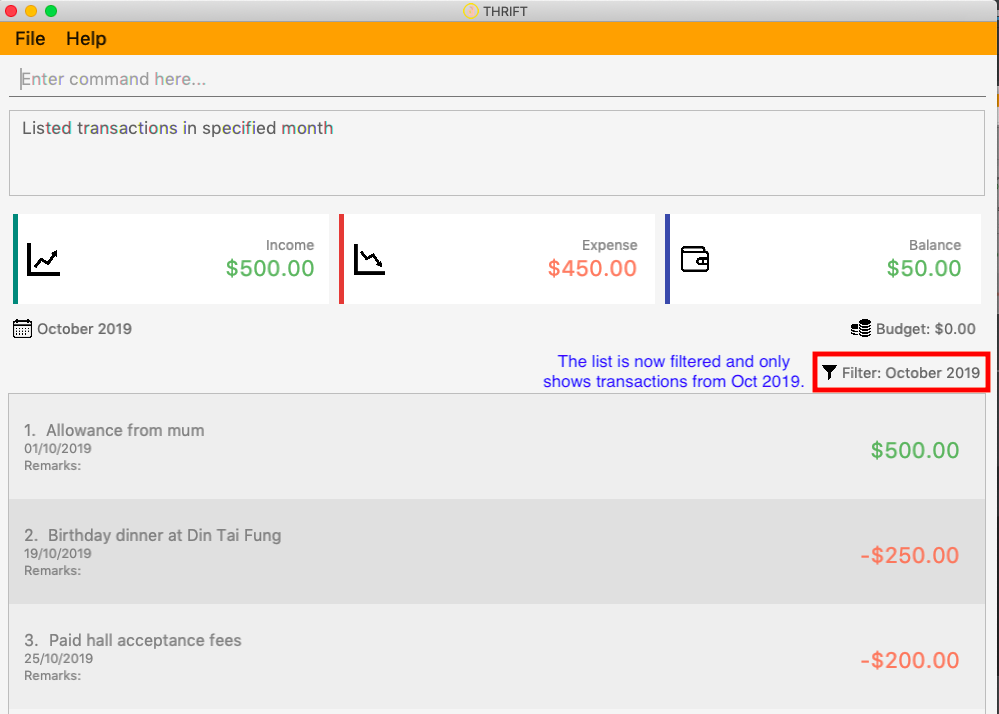
Step 5. The final list of filtered transactions will be brought up. The income, expense, and balance values in the UI will be updated accordingly as well, to reflect the correct values for the filtered month.
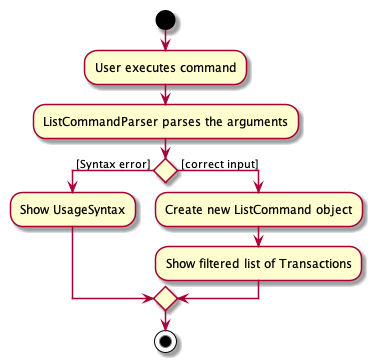
The activity diagram below will give an overview of what is happening when the command is executed.
4.7.2. Design considerations
Aspect: Using Predicate to improve extendability of the feature in the future
-
Alternative 1 (current choice): Create a new
Predicatebased on the arguments each time.-
Pros: The filter feature could be added to and improved in the future to further accommodate new arguments other than month and tag, and still be able to filter by a combination of the different arguments.
-
Cons: Not as easy to implement.
-
-
Alternative 2: Use a fixed
Predicatewritten beforehand to filter the list for each argument.-
Pros: Straightforward to implement, a specific
Predicatecan be used for the specific argument. -
Cons: Not easily extendable as in the future if we want to filter by new arguments, we will have to write a new
Predicatefor each argument.
-
Eventually we may decide to use a combination of both alternatives as it is possible that different arguments are easier to implement using different methods.
4.7.3. Proposed extension
In the near future, we plan to enhance the filtering feature. We want to improve the list command to take in tags as a
possible argument similar to month, and thus allow for the possible filtering by tags as well. The design considerations mentioned
earlier was to facilitate this proposed extension, since we would require the use of a Predicate which will be
created using the tag in the argument as well. By doing so, we reduce the difficulty of enhancing the filtering feature in
the future. This would benefit the simplicity of the command and further enhance the user experience, for them to be able
to filter by a combination of both months and tags.
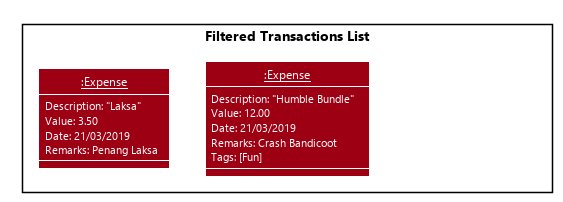
The image below shows how a possible future implementation of this feature could look like:
4.8. [Proposed] Data encryption
With the emphasis on information security these days, we are concerned about protecting the privacy of our users. We have
discussed on how we can protect our users' data on THRIFT by making use of modern encryption schemes to protect against
prying eyes. The encryption will take place at the back-end with minimal disruptions to the user. The user does not need additional
knowledge about how the encryption work as THRIFT will handle all encryption and decryption operations for them.
4.8.1. Proposed implementation
In order to ensure a seamless experience, we propose a new Keystore module, along with a KeystoreManager that will
be interacting closely with the Logic and Storage modules. The class diagram below gives an overview of how the
new Keystore would fit in:
We recommend that the KeystoreManager implements the following methods:
-
KeystoreManager#setEncryptionScheme(Cipher)- Sets the encryption scheme to be that ofCipher. -
KeystoreManager#encryptThrift(Thrift)- Encrypts the currentThriftobject with the encryption scheme set inKeystoreManager. -
KeystoreManager#decryptThrift()- Decrypts the encrypted text file, restore theThriftobject and replace the currentThrift.
The decryption will take place upon MainApp#init() while encryption will happen every time LogicManager#execute() is called.
|
4.8.2. Design considerations
There is one factor about the way encryption should be implemented that we considered.
Aspect: Allowing the user to specify the encryption strength
-
Alternative 1: The user can specify the algorithm, as well as the key size of the encryption scheme.
-
Pros: Power users have the freedom to fine-tune the encryption strength to suit their needs.
-
Cons: Regular users might not know which encryption scheme to use.
-
-
Alternative 2: Preset the encryption scheme to use AES-256, which provides one of the best protections in the market due to its key size.
-
Pros: Encrypted data will be secured even if stolen, preventing unauthorised access.
-
Cons: Users with slower processor chips on their computer might experience a noticeable performance drop when using
THRIFT.
-
We believe that both alternatives have reasonable pros and cons and choosing either option would be beneficial to THRIFT.
The added data security will assure the user that their data is safe and allows them to use THRIFT with a peace of mind.
4.9. [Proposed] Artificial Intelligence (AI)
Artificial intelligence (AI) is the simulation of human intelligence processes by machines such as computer systems. AI tries to mimic the learning process of humans in order to perform self-correction.
We want THRIFT to possess the ability to make calculated decisions and provide the user with appropriate recommendations under the appropriate situations.
This way, we can enhance the user experience and make our application more effective.
The following sections will describe how we plan to implement this feature and the possible design considerations.
4.9.1. Proposed implementation
Adhering to the Open-Closed principle, we will not modify the existing architecture but extend it. The following class diagram illustrates how we propose to do it, by adding 2 new classes to the existing architecture:
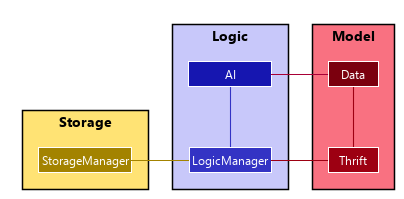
The new classes will have the following roles:
-
AI: Analyses data from theDataand perform machine learning on it. If the need arises, feedback to theDataclass to morph the data inside. Modifies the actions taken by theLogicManagerclass based on the machine learning model. -
Data: Collects data fromThriftand formats to it to a form understandable by theAIclass. It can be modified by theAIclass in the process of machine learning.
4.9.2. Design consideration
Aspect: Portability of the learning model
The portability of the learning model will determine the complexity of the implementation and the following designs can be considered:
-
Alternative 1: Include the machine learning algorithms and models with the application
-
Pros: Allows the application to be portable and self-contained
-
Cons: Results in a larger application size
-
-
Alternative 2: Develop the machine learning algorithms and models as a separate application, which can be offloaded to a remote location
-
Pros: Allows the main application to be smaller in size
-
Cons: The application is no longer portable and self-contained, and have to depend on the availability of the remote application
-
We believe that both alternatives can be considered as choosing either option brings a different benefit to THRIFT.
A hybrid implementation of both alternatives can also be considered.
Regardless of what is eventually chosen, the user experience will be improved by artificial intelligence.
4.10. [Proposed] External report generation
We plan to increase the practicality of THRIFT by enabling the user to generate an external report document that they can keep for recording purposes. This proposed report will display the user’s income, expenditure and budget information on a monthly basis. The user can also choose whether to include all transactions in the month or only transactions in selected tag categories in the report.
4.10.1. Proposed implementation
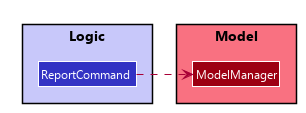
To execute report generation, we propose a new ReportCommand that is a subclass of NonScrollingCommand and
works with ModelManager like other commands as described in the Logic section. The following
diagram shows the dependency between ReportCommand and ModelManager:
ReportCommand#execute() will retrieve information needed from the existing transactions list through
ModelManager retrieval operations, process them and generate an external report document using Java APIs.
The current formats we have in mind for report documents and the relevant Java APIs to handle them are:
4.11. Logging
We are using java.util.logging package for logging. The LogsCenter class is used to manage the logging levels and logging destinations:
-
The logging level can be controlled using the
logLevelsetting in the configuration file (See Section 4.12, “Configuration”). -
The
Loggerfor a class can be obtained usingLogsCenter.getLogger(Class)which will log messages according to the specified logging level. -
The log messages are output through:
Consoleand to a.logfile.
Logging Levels
-
SEVERE: Detected a critical problem which may possibly cause the termination of the application -
WARNING: Exercise caution if continuing -
INFO: Display information showing the noteworthy actions by the application -
FINE: Display details that are usually not noteworthy but may be useful in debugging e.g. print the actual list instead of just its size
4.12. Configuration
Certain properties of the application can be controlled (e.g user prefs file location, logging level) through the configuration file (default: config.json).
5. Documentation
We use AsciiDoc for writing documentation.
| We chose AsciiDoc over Markdown because AsciiDoc, although a bit more complex than Markdown, provides more flexibility in formatting. |
5.1. Editing documentation
See UsingGradle.adoc to learn how to render .adoc files locally to preview the end result of your edits.
Alternatively, you can download the AsciiDoc plugin for IntelliJ, which allows you to preview the changes you have made to your .adoc files in real-time.
5.2. Editing diagrams
See UsingPlantUml.adoc to find out how to create and update the UML diagrams in the developer guide.
5.3. Publishing documentation
See UsingTravis.adoc to learn how to deploy GitHub Pages using Travis.
5.4. Converting documentation to PDF format
We use Google Chrome for converting documentation to PDF format, as Chrome’s PDF engine preserves hyperlinks used in webpages.
Here are the steps to convert the project documentation files to PDF format.
-
Follow the instructions in
UsingGradle.adocto convert the AsciiDoc files in the docs/ directory to HTML format. -
Go to your generated HTML files in the build/docs folder, right click on them and select Open with → Google Chrome.
-
Within Chrome, click on the Print option in Chrome’s menu.
-
Set the destination to Save as PDF, then click Save to save a copy of the file in PDF format. For best results, use the settings indicated in the screenshot below.

5.5. Site-wide documentation settings
The build.gradle file specifies some project-specific AsciiDoc attributes which affects how all documentation files within this project are rendered.
Attributes left unset in the build.gradle file will use their default value, if any.
|
| Attribute name | Description | Default value |
|---|---|---|
|
The name of the website. If set, the name will be displayed near the top of the page. |
not set |
|
URL to the site’s repository on GitHub. Setting this will add a "View on GitHub" link in the navigation bar. |
not set |
5.6. Per-file documentation settings
Each .adoc file may also specify some file-specific AsciiDoc attributes which affects how the file is rendered.
Asciidoctor’s built-in attributes may be specified and used as well.
| Attributes left unset in .adoc files will use their default value, if any. |
| Attribute name | Description | Default value |
|---|---|---|
|
Site section that the document belongs to.
This will cause the associated item in the navigation bar to be highlighted.
One of: |
not set |
|
Set this attribute to remove the site navigation bar. |
not set |
5.7. Site template
The files in docs/stylesheets are the CSS stylesheets of the site. You can modify them to change some properties of the site’s design.
The files in docs/templates controls the rendering of .adoc files into HTML5. These template files are written in a mixture of Ruby and Slim.
|
Modifying the template files in docs/templates requires some knowledge and experience with Ruby and Asciidoctor’s API. You should only modify them if you need greater control over the site’s layout than what stylesheets can provide. The THRIFT team does not provide support for modified template files. |
6. Testing
This section describes the type of tests used in THRIFT and how it can be executed.
6.1. Running tests
There are two ways to run tests.
Method 1: Using IntelliJ JUnit test runner
-
To run all tests, right-click on the src/test/java folder and choose Run 'All Tests'
-
To run a subset of tests, you can right-click on a test package, test class, or a test and choose Run 'ABC'
Method 2: Using Gradle
-
Open a console and run the command gradlew clean test (Mac/Linux: ./gradlew clean test)
See UsingGradle.adoc for more info on how to run tests using Gradle.
|
6.2. Types of tests
We have three types of tests:
-
Unit tests targeting the lowest level methods/classes.
e.g.thrift.commons.util.StringUtilTest -
Integration tests that are checking the integration of multiple code units (those code units are assumed to be working).
e.g.thrift.storage.StorageManagerTest -
Hybrids of unit and integration tests. These test are checking multiple code units as well as how the are connected together.
e.g.thrift.logic.LogicManagerTest
6.3. Troubleshooting testing
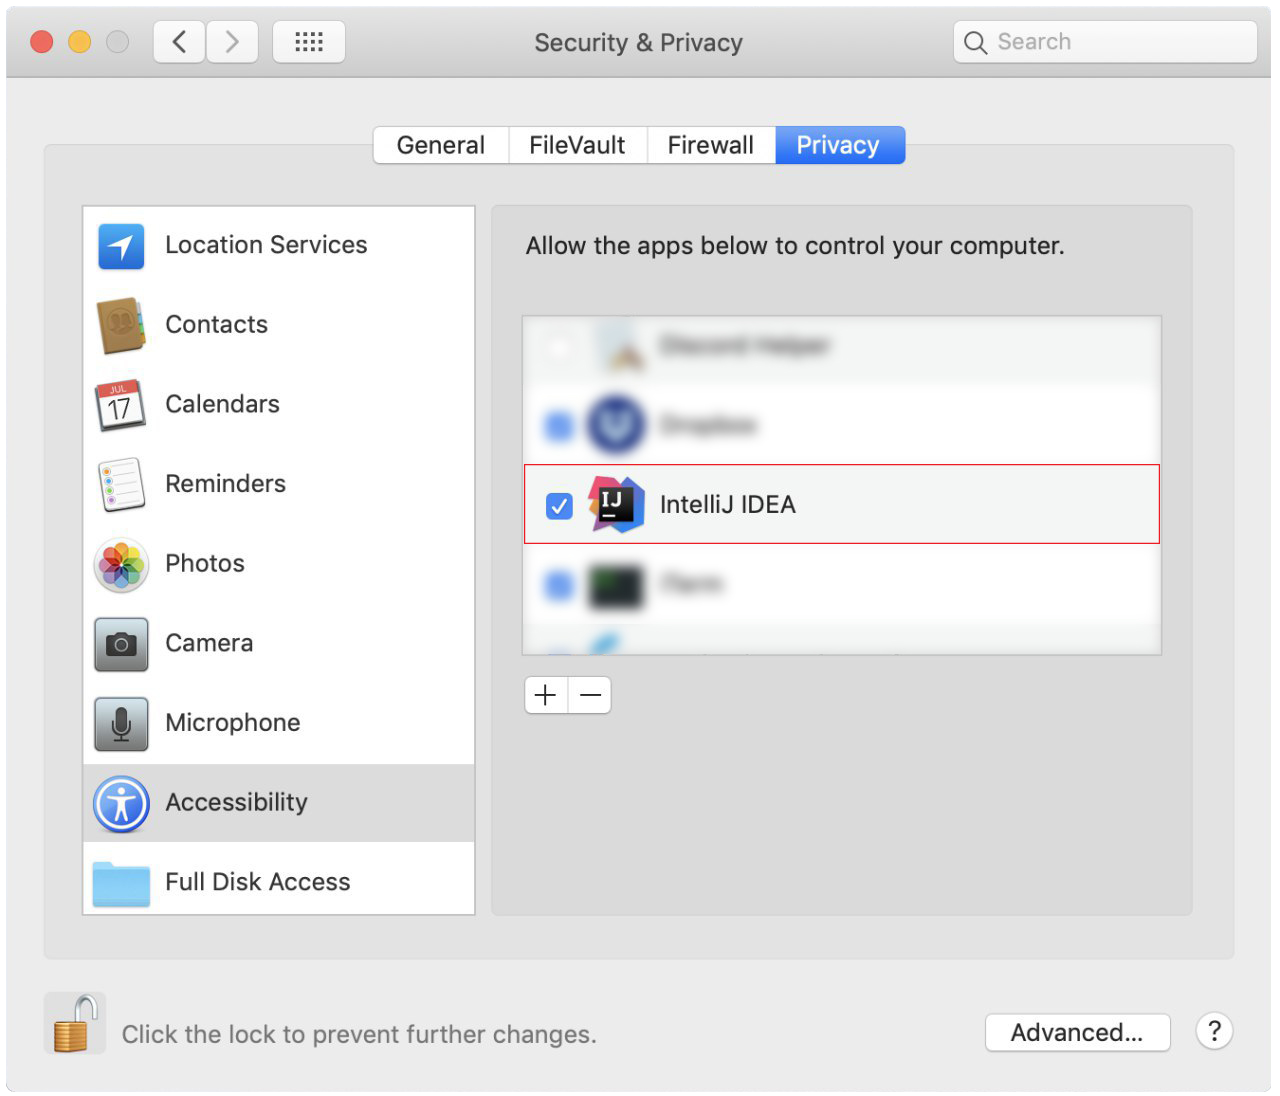
Problem: Keyboard and mouse movements are not simulated on macOS Mojave, resulting in GUI Tests failure.
-
Reason: From macOS Mojave onwards, applications without
Accessibilitypermission cannot simulate certain keyboard and mouse movements. -
Solution: Open System Preferences, click Security and Privacy → Privacy → Accessibility, and check the box beside Intellij IDEA.
Accessibility permission is granted to IntelliJ IDEA7. Dev ops
This section describes the practices and tools used during development.
7.1. Build automation
See UsingGradle.adoc to learn how to use Gradle for build automation.
7.2. Continuous Integration
We use Travis CI and AppVeyor to perform Continuous Integration on our projects. See UsingTravis.adoc and UsingAppVeyor.adoc for more details.
7.3. Coverage reporting
We use Coveralls to track the code coverage of our projects. See UsingCoveralls.adoc for more details.
7.4. Documentation previews
When a pull request has changes to AsciiDoc files, you can use Netlify to see a preview of how the HTML version of those AsciiDoc files will look like when the pull request is merged. See UsingNetlify.adoc for more details.
7.5. Making a release
Here are the steps to create a new release.
-
Update the version number in
MainApp.java. -
Generate a JAR file using Gradle>>.
-
Tag the repo with the version number. e.g. v0.1
-
Create a new release using GitHub and upload the JAR file you created.
7.6. Managing dependencies
A project often depends on third-party libraries. For example, THRIFT depends on the Jackson library for JSON parsing. Managing these dependencies can be automated using Gradle. Gradle can download the dependencies automatically, which is better than these alternatives:
-
Include those libraries in the repo (this bloats the repo size)
-
Require developers to download those libraries manually (this creates extra work for developers)
Appendix A: Product scope
Target user profile:
-
targets money-conscious NUS students
-
requires management of a significant number of transactions
-
prefers apps on desktop over other platforms
-
types quickly and prefers it over mouse input
-
experiences no discomfort with CLI navigation
Value proposition:
-
provides effective financial management compared to typical mouse/GUI driven applications
-
makes planning for future spending easier
-
congregates all information regarding incomes and expenses in a single location
Appendix B: User stories
Priorities: High (must have) - * * *, Medium (nice to have) - * *, Low (unlikely to have) - *
| Priority | As a … | I want to … | So that I can… |
|---|---|---|---|
|
NUS student |
track my spending |
manage my finances better |
|
movie addict who watches every movie that comes out |
keep track of my movie ticket and snack expenses |
have enough money to watch the movies I want. |
|
computing student who has many software subscriptions |
use the recurring expenses tracker |
manage my subscription payments |
|
student staying in the Halls with many expenses |
see all my expenses in a central spot |
keep track of all the different expenses |
|
NUS international student |
keep track of my travelling and spending expenses |
have enough money when I travel around Singapore |
|
someone who loves travelling |
use the tracker to help me plan for my travelling budgets |
fully enjoy my time on vacation |
|
SOC student always on my laptop |
write down my expenses |
really quickly due to the command-line nature |
|
student who uses both PayLah and cash interchangeably |
tag my expenses |
keep track of both expenses |
|
NUS student who loans money to a lot of friends |
use the debt tracker |
track and collect my interest |
|
student accepting financial aid |
use the expense tracker report |
keep within my budget |
|
student who borrows money frequently from other people |
use the debt tracker |
remember who I owe money to |
|
NUS international student |
be able to keep track of recurring utility expenses such as phone bills |
plan a suitable budget |
|
phone junkie |
set aside enough money |
purchase the latest phones and accessories |
|
student who is conscious about money |
be able to view my monthly expenditure |
know how much I had spent this month |
|
female buying clothes frequently |
track exactly how much I spend on clothes each month using the tracker and filter |
don’t exceed my clothes budget |
|
student who likes to buy games online |
use the expense tracker funds left |
see if I am able to pay my school fees |
|
mobile game addict who makes a lot of in-app purchases |
use the expenses tracker report |
manage my finances and to sustain my essential expenses |
|
student that frequently takes on part-time jobs |
use finance planner |
track my income |
|
frugal NUS student |
use the expense tracker report |
optimise my finances |
|
social animal frequently going to clubs and bars |
plan out my expenses |
moderate my spending on social activities and keep up my balanced lifestyle |
|
student that stays in Hall |
add my expenses to the expense tracker |
track funds contributed to hall activities |
|
student who wants to save more money |
be able to compare my past expenditure with my current expenditure |
know if I had spent more money or saved money this month |
|
hall resident who eats supper daily |
keep track of what I have been eating and how much I usually spend on supper |
don’t overspend on each supper |
|
child of wealthy parent |
easily delete previous expenses |
properly count my expenditure should my parents decide to help cover some parts of it |
|
careless student |
make some changes to the information |
ensure that the application displays the correct information |
|
student who loves to keep track of finance |
view all the possible commands |
fully utilise the functionality offered by the application |
|
student that wants to allocate less money to material goods and more to food |
analyse the spending by category |
adjust accordingly |
|
on-campus resident who likes to cook my own food |
track my grocery bills |
moderate the cost and frequency of grocery shopping |
|
motor enthusiast |
use the planner to set aside funds |
keep purchasing vehicle parts, modifications and accessories and keep pursuing my hobby |
|
student who has a bad habit of spending a lot on material goods |
see which goods are taking up most of my monthly budget |
better manage my finances |
|
Hypebeast that spends a lot of money on branded goods |
look at my recent spending percentage |
manage my finances and keep my budget |
|
student who is going for exchange |
make sure that I bring enough foreign currency |
avoid using my credit card |
|
student who is currently in a relationship |
the tracker to help me set aside enough money for both my partner and I |
get married soon |
|
student who always lends money to people |
be able to send receipt to my loanee |
claim back my money |
|
dota addict who always buy arcanas and battle pass levels |
track my spending |
afford to buy more battle pass levels |
|
active youth in need of sustenance within a limited budget |
get recommendations for food prices |
be healthy physically and financially |
|
shopaholic |
use the finance planner to find discounts |
spend less on my shopping |
|
NUS student with stingy and over-controlling parents |
send my expense report for the month to my parents to view easily |
avoid them asking me what I have been spending on all the time |
|
NUS student whose transaction details may be inaccurate in retrospect due to cashbacks or receipt discrepancies |
modify transactions in my list |
transactions have the most updated and accurate information |
|
NUS student with completely or almost identical repeated transactions |
make copies of such transactions |
more convenient to add them instead of having to type them out fully each time |
Appendix C: Use cases
(For all use cases below, the System is THRIFT and the Actor is the user, unless specified otherwise)
Use case: Setting monthly budget
-
User requests to set the budget of a certain month to a specified amount.
-
THRIFTprocesses the request and sets the specified amount as the budget for that certain month.Use case ends
Extensions
-
1a. The parameters specified by the user are not valid.
-
1a1.
THRIFTdisplays an invalid parameter error to the user and the monthly budget is not updated.Use case ends
-
Use case: Add an expense/income transaction
MSS
-
User requests to add a new expense or income transaction into their records.
-
THRIFTprocesses the request and adds the expense/income transaction into the transactions list.Use case ends
Extensions
-
1a. The parameters specified by the user are not valid.
-
1a1.
THRIFTdisplays an invalid parameter error to the user and the transactions list is not updated.Use case ends
-
Use case: Delete a transaction
MSS
-
User requests to delete an existing transaction from their records.
-
THRIFTprocesses the request and removes the transaction from the transactions list.Use case ends
Extensions
-
1a. The transaction record specified by the user is not valid.
-
1a1.
THRIFTdisplays an invalid parameter error to the user and the transactions list is not updated.Use case ends
-
Use case: Update a transaction’s details
MSS
-
User requests to update a transaction’s name, value, remark or tags.
-
THRIFTprocesses the request, updates the specified details in the transactions list and informs user of what has been changed.Use case ends
Extensions
-
1a. Some parameters specified by the user are not valid.
-
1a1.
THRIFTdisplays an invalid command format error to the user and does not update details for invalid parameters.Use case ends
-
Use case: Clone a transaction
MSS
-
User requests to clone a transaction, specifying the occurrence of clones: how many clones are to be created and their frequency over a future period.
-
THRIFTprocesses the request and adds the specified number of identical transactions to the transactions list.Use case ends
Extensions
-
1a. User does not specify the occurrence of clones.
-
Use case resumes from Step 2
-
-
1b. The index parameter specified by the user is not valid.
-
1b1.
THRIFTdisplays an invalid command format error to the user and does not update the transactions list.Use case ends
-
-
1b. The occurrence specified by the user is not valid.
-
1b1.
THRIFTdisplays an invalid command format error to the user and does not update the transactions list.Use case ends
-
Use case: Show help window
MSS
-
User requests to view to syntax of a specific command.
-
THRIFTdisplays the syntax of the requested command.Use case ends
Extensions
-
1a. The command specified by the user is not valid.
-
1a1.
THRIFTdisplays an invalid command error to user.Use case ends
-
Use case: List monthly transactions
MSS
-
User requests to view list of transactions for a specific month.
-
THRIFTdisplays transactions of that month.Use case ends
Use case: Tag a transaction
MSS
-
User requests to tag a specific transaction.
-
THRIFTprocesses the request and adds the tag to the specific transaction.Use case ends
Extensions
-
1a. The command specified by the user is not valid.
-
1a1.
THRIFTdisplays an invalid command error to user.Use case ends
-
Use case: Untag a transaction
MSS
-
User requests to untag a specific transaction.
-
THRIFTprocesses the request and removes the tag from the specific transaction.Use case ends
Extensions
-
1a. The parameters specified by the user are not valid.
-
1a1.
THRIFTdisplays an invalid parameter error to the user and the transaction is not updated.Use case ends
-
Use case: Convert a transaction
MSS
-
User requests to convert the currency of a specific transaction to a new currency.
-
THRIFTprocesses the request and updates specific transaction with the new value in the new currency.Use case ends
Extensions
-
1a. The parameters specified by the user are not valid.
-
1a1.
THRIFTdisplays an invalid parameter error to the user and the transaction is not updated.Use case ends
-
Use case: Convert a value
MSS
-
User requests to convert a value in SGD to a specific currency.
-
THRIFTprocesses the request and displays the new value in the new currency.Use case ends
Extensions
-
1a. The parameters specified by the user are not valid.
-
1a1.
THRIFTdisplays an invalid parameter error to the user.Use case ends
-
Use case: Find a keyword in Transaction’s Remark and Description field
MSS
-
User requests to search for a keyword in THRIFT.
-
THRIFTprocesses its currently saved entire transaction list to look for matches. -
THRIFTfound matches and display the results at theTransactionListPanelscreen.Use case ends
Appendix D: Non functional requirements
-
THRIFTshould be able to run on any mainstream OS as long as it hasJava 11installed. -
THRIFTshould be able to hold up to 250 transactions without a noticeable drop in performance for typical usage. -
A user with above average typing speed for regular English text (i.e. not code, not system admin commands) should be able to accomplish most of the tasks faster using commands than using the mouse.
-
THRIFTshould be able to run with or without internet connection. -
THRIFTshould work for a single user only. -
THRIFTshould not require user to install. -
Features implemented should be testable using manual testing and automated testing.
-
THRIFTshould support screen resolution of 1920 x 1080 or higher. -
THRIFTshould support the English locale only. Any locale from this link that starts with "en" will be supported.
Appendix E: Glossary
| THRIFT |
Stands for "Terminal-input Human Readable Interactive Finance Tracker". It is the application this developer guide is for. |
| API |
Stands for "Application Programming Interface" which simplifies programming by abstracting the underlying implementation and only exposing objects or actions the developer needs. |
| Locale |
Stands for a setting on the user’s computer that defines the user’s language and region. |
| PlantUML |
Stands for a software tool that we use to render the diagrams used in this document. |
| NFR |
Stands for "Non-functional Requirement" |
| Mainstream OS |
Stands for commonly used Operating Systems (OS) such as Windows, Linux, Unix, OS-X |
| Regular English Text |
Stands for text with ordinary english grammar structures and vocabulary generally used by the public. It excludes syntax related to programming and system administration. |
| System Administration |
Stands for the field of work in which someone manages one or more systems, be they software, hardware, servers or workstations with the goal of ensuring the systems are running efficiently and effectively. |
| MSS |
Stands for Main Success Scenario that describes the interaction for a given use case, which assumes that nothing goes wrong. |
Appendix F: Instructions for manual testing
Given below are instructions to test the app manually.
| These instructions only provide a starting point for testers to work on; testers are expected to do more exploratory testing. |
F.1. Launching and shutting down
-
Initial launch
-
Download the jar file and copy into an empty folder
-
Double-click the jar file
Expected: Shows the GUI with empty transaction.
-
F.2. Setting a monthly budget
-
Setting a monthly budget to be a certain amount.
-
Test case: budget v/1000 d/10/2019
Expected: The monthly budget for 10/2019 is now set to $1000. Details of the new monthly budget is shown in the Result Box. -
Test case: budget
Expected: The monthly budget is not updated. Error details shown in the status message (missing d/MONTH and v/VALUE parameters). -
Test case: budget v/10000000000 d/10/2019
Expected: The monthly budget is not updated. Error details shown in the status message (v/VALUE input exceeds constraint of 1 billion).
-
F.3. Adding a transaction
-
Adding a transaction, be it income or expense.
-
Test case: add_expense n/Bought a pair of Apple Earpods v/350
Expected: A new expense transaction is added into the list. Details of the expense transaction shown in the Result Box. The current system date is automatically added to this new transaction and saved into the transaction list. -
Test case: add_income n/Awarded bursary prize v/500
Expected: A new income transaction is added into the list. Details of the income transaction shown in the Result Box. The current system date is automatically added to this new transaction and saved into the transaction list. -
Test case: add_expense n/Lunch in school
Expected: No transaction is added. Error details shown in the Result Box (missing v/VALUE parameter).
-
F.4. Deleting a transaction
-
Deleting a transaction while all transactions are listed
-
Prerequisites: Ensure that there is at least one transactions being listed in the transaction list using either the list command or find command.
-
Test case: delete i/1
Expected: First transaction is deleted from the list. Details of the deleted transaction shown in the Result Box. -
Test case: delete i/0
Expected: No transaction is deleted. Error details shown in the Result Box (invalid i/INDEX parameter).
-
F.5. Updating a transaction’s details
-
Updating a transaction’s details and reflecting changes in the list.
-
Prerequisites: List all transactions using the list command. The first transaction is "[-] Laksa ($10.50) Date: 02/11/2019 Remarks: Tags: [Lunch][Food]".
-
Test case: update i/1 n/Fried Rice
Expected: Details of the updated transaction and original transaction shown in status message. Displayed list scrolls to updated item which reflects the changes. -
Test case: update i/1 v/20
Expected: Details of the updated transaction and original transaction shown in status message. Displayed list scrolls to updated item which reflects the changes. -
Test case: update i/1 n/Fried Rice v/20 t/Lunch t/Food
Expected: Details of the updated transaction and original transaction shown in status message. Displayed list scrolls to updated item which reflects the changes. -
Test case: update i/INVALID_INDEX where INVALID_INDEX is a number less than 1 or more than list size.
Expected: No changes. Error details shown in status message. -
Test case: update i/1 z/Calamari
Expected: No changes. Error details shown in status message. -
Test case: update firstTransaction
Expected: No changes. Error details shown in status message. -
Test case: update
Expected: No changes. Error details shown in status message.
-
F.6. Cloning a transaction
-
Creating a duplicate of a transaction.
-
Prerequisites: List all transactions using the list command. At least one transaction is in the list.
-
Test case: clone i/1
Expected: New transaction identical to first transaction in the list added to the bottom of the list. Details of the cloned transaction shown in the status message. Date string for new transaction is automatically saved into the transaction list. -
Test case: clone i/INVALID_INDEX where INVALID_INDEX is a number less than 1 or more than list size.
Expected: No transaction is cloned. Error details shown in status message. -
Test case: clone firstTransaction
Expected: No changes. Error details shown in status message. -
Test case: clone
Expected: No changes. Error details shown in status message. -
Test case: clone i/1 o/daily:3
Expected: 3 new transactions identical to first transaction in the list added to the bottom of the list, with their dates set 1 day apart. -
Test case: clone i/1 o/daily:-1
Expected: No changes. Error details shown in status message. -
Test case: clone i/1 o/onceeveryday:-1
Expected: No changes. Error details shown in status message. -
Test case: clone i/1 o/yearly:6
Expected: No changes. Error details shown in status message. -
Test case: clone i/1 o/monthly:13
Expected: No changes. Error details shown in status message. -
Test case: clone i/1 o/daily
Expected: No changes. Error details shown in status message. -
Test case: clone i/1 o/monthly:5:6:fgzsfdsf:y564s:3234:
Expected: No changes. Error details shown in status message.
-
F.7. Listing the transactions
-
Listing out transactions by month.
-
Prerequisites: At least one transaction in the list.
-
Test case: list
Expected: The entire list of transactions will be shown. -
Test case: list m/01/2019
Expected: The list of transactions for January 2019 will be shown.
-
F.8. Tagging a transaction
-
Tagging a transaction and reflecting changes in the list.
-
Prerequisites: List all transactions using the list command. The first transaction is "1. [-] Laksa ($10.50) [Lunch][Food]".
-
Test case: tag i/1 t/EXPENSIVE
Expected: Details of the tagged transaction and the original transaction are shown in the Result Box. Listing the transaction reflects changes. -
Test case: tag i/INVALID_INDEX t/VALID_TAG where INVALID_INDEX is a number less than 1 or more than list size and VALID_TAG is a valid tag.
Expected: No changes to any transaction entry. Details of the error is shown in the Result Box. -
Test case: tag i/VALID_INDEX t/ALREADY_INSIDE_TAG where VALID_INDEX is a valid transaction index and ALREADY_INSIDE_TAG is already inside the transaction specified.
Expected: No changes to the transaction entry. Details of the error is shown in the Result Box. -
Test case: tag firstTransaction
Expected: No changes to any transaction entry. Details of the error is shown in the Result Box. -
Test case: tag
Expected: No changes to any transaction entry. Details of the error is shown in the Result Box.
-
F.9. Untagging a transaction
-
Untagging a transaction and reflecting changes in the list.
-
Prerequisites: List all transactions using the list command. The first transaction is "1. [-] Laksa ($10.50) [Lunch][Food]".
-
Test case: untag i/1 t/FOOD
Expected: Details of the untagged transaction shown in Result Box. Listing the transaction reflects changes. -
Test case: untag i/INVALID_INDEX t/VALID_TAG where INVALID_INDEX is a number less than 1 or more than list size and VALID_TAG is a valid tag.
Expected: No changes to any transaction entry. Details of the error is shown in the Result Box. -
Test case: untag i/VALID_INDEX t/NOT_INSIDE_TAG where VALID_INDEX is a valid transaction index and NOT_INSIDE_TAG is not inside the transaction specified.
Expected: No changes to the transaction entry. Details of the error is shown in the Result Box. -
Test case: untag secondTransaction
Expected: No changes to any transaction entry. Details of the error is shown in the Result Box. -
Test case: untag
Expected: No changes to any transaction entry. Details of the error is shown in the Result Box.
-
F.10. Converting a value
-
Converting a values’s currency and displaying it
-
Test case: convert v/VALUE c/SGD c/USD
Expected: Original value and converted value displayed to the user in the Result Box. -
Test case: convert v/VALUE c/SGD c/INVALID_CURRENCY where INVALID_CURRENCY is not a supported currency.
Expected: Details of the error is shown in the Result Box. -
Test case: convert v/VALUE c/INVALID_CURRENCY c/USD where INVALID_CURRENCY is not a supported currency.
Expected: Details of the error is shown in the Result Box.
-
F.11. Finding a transaction
-
Looking up transactions that matches any of the supplied keywords in its
RemarkandDescriptionfields.-
Test case: find Apple
Expected: Transactions with the word Apple in itsRemarkorDescriptionfield will be displayed in the transaction list to the user.
-
F.12. Undoing the previous command
-
Undoing the previous command and reflecting changes in the list
-
Prerequisites: List all transactions using the list command. There are at least two transactions in the list.
-
Test case:
-
add_expense n/Chicken rice v/3
-
undo
Expected: Transaction regarding the expense spent on "Chicken Rice" is removed from the list.
-
-
Test case:
-
add_income n/Salary v/2500
-
undo
Expected: Transaction regarding the income received from "Salary" is removed from the list.
-
-
Test case:
-
delete i/1
-
undo
Expected: The first transaction that is removed from the list is restored to its original position.
-
-
Test case: (Assuming that the first transaction is "1. [-] Chicken rice ($3.00)")
-
update i/1 n/Fried Rice
-
undo
Expected: The description of the first transaction is changed back to "Chicken Rice"".
-
-
Test case:
-
clone i/1
-
undo
Expected: The newly cloned transaction is removed from the list.
-
-
Test case:
-
clone i/1 o/daily:3
-
undo
Expected: Three new transactions, which are added using clone, are removed from the list.
-
-
Test case:
-
tag i/1 t/LUNCH
-
undo
Expected: The "LUNCH" tag is removed from the first transaction in the list.
-
-
Test case:
-
untag i/1 t/LUNCH
-
undo
Expected: The "LUNCH" tag is added back to the first transaction in the list.
-
-
Test case: (Assuming that the budget for "11/2019" is "$0.00")
-
budget v/1000 d/11/2019
-
undo
Expected: The budget shown in the UI for "11/2019" is reset to "$0.00".
-
-
Test case:
-
list
-
undo
Expected: A message is shown in the Result Box, indicating that there are no available commands for the user to undo.
-
-
Test case: undo 123
Expected: A message is shown in the Result Box, indicating that it is an invalid command.
-
F.13. Redoing the undone command
-
Redoing the undone command and reflecting changes in the list
-
Prerequisites: List all transactions using the list command. There are at least two transactions in the list.
-
Test case:
-
add_expense n/Laksa v/3
-
undo
-
redo
Expected: Transaction regarding the expense spent on "Laksa" is added back to the list.
-
-
Test case:
-
add_income n/bursary v/2500
-
undo
-
redo
Expected: Transaction regarding the income received from "bursary" is added back to the list.
-
-
Test case:
-
delete i/1
-
undo
-
redo
Expected: The first transaction is removed from the list.
-
-
Test case: (Assume that the first transaction is "1. [-] Chicken rice ($3.00)")
-
update i/1 n/Fried Rice
-
undo
-
redo
Expected: The description of the first transaction is displayed as "Fried Rice".
-
-
Test case:
-
clone i/1
-
undo
-
redo
Expected: The newly cloned transaction is added back to the list.
-
-
Test case:
-
clone i/1 o/daily:3
-
undo
-
redo
Expected: Three new cloned transactions are added back to the list.
-
-
Test case:
-
tag i/1 t/FOOD
-
undo
-
redo
Expected: The "FOOD" tag is added back to the first transaction in the list.
-
-
Test case:
-
untag i/1 t/FOOD
-
undo
-
redo
Expected: The "FOOD" tag is removed from the first transaction in the list.
-
-
Test case: (Assuming that the budget for "11/2019" is "$0.00")
-
budget v/1000 d/11/2019
-
undo
-
redo
Expected: The budget shown in the UI for "11/2019" is set to "$1000.00".
-
-
Test case:
-
tag i/1 t/LUNCH
-
undo
-
clone i/1
-
redo
Expected: New cloned transaction is added to the bottom of the list, but the "LUNCH" tag is not added back to the first transaction in the list. There is a message shown in the Result Box indicating that there are no available commands for the user to redo.
-
-
Test case:
-
list
-
redo
Expected: A message is shown in the Result Box, indicating that there are no available commands for the user to redo.
-
-
Test case: redo 123
Expected: A message is shown in the Result Box, indicating that it is an invalid command.
-
F.14. Showing help window
-
Viewing the usage of the command
-
Test case: help
Expected: A new pop-up help window containing the link to our User Guide is displayed. -
Test case: help delete
Expected: Usage of the delete command is shown in the Result Box.
-
F.15. Saving data
-
Dealing with missing/corrupted data files
-
Delete the data files at
.\data\thrift.jsonand.\data\currency.json(depending on your Operating System, you might need to use the forward slash '/' for the path).
-